Showing posts with label reverse engineering. Show all posts

Friday, April 21, 2017

DoublePulsar Initial SMB Backdoor Ring 0 Shellcode Analysis

One week ago today, the Shadow Brokers (an unknown hacking entity) leaked the Equation Group's (NSA) FuzzBunch software, an exploitation framework similar to Metasploit. In the framework were several unauthenticated, remote exploits for Windows (such as the exploits codenamed EternalBlue, EternalRomance, and EternalSynergy). Many of the vulnerabilities that are exploited were fixed in MS17-010, perhaps the most critical Windows patch in almost a decade.

Side note: You can use my MS17-010 Metasploit auxiliary module to scan your networks for systems missing this patch (uncredentialed and non-intrusive). If a missing patch is found, it will also check for an existing DoublePulsar infection.

Introduction

For those unfamiliar, DoublePulsar is the primary payload used in SMB and RDP exploits in FuzzBunch. Analysis was performed using the EternalBlue SMBv1/SMBv2 exploit against Windows Server 2008 R2 SP1 x64.

The shellcode, in tl;dr fashion, essentially performs the following:

  • Step 0: Shellcode sorcery to determine if x86 or x64, and branches as such.
  • Step 1: Locates the IDT from the KPCR, and traverses backwards from the first interrupt handler to find ntoskrnl.exe base address (DOS MZ header).
  • Step 2: Reads ntoskrnl.exe's exports directory, and uses hashes (similar to usermode shellcode) to find ExAllocPool/ExFreePool/ZwQuerySystemInformation functions.
  • Step 3: Invokes ZwQuerySystemInformation() with the enum value SystemQueryModuleInformation, which loads a list of all drivers. It uses this to locate Srv.sys, an SMB driver.
  • Step 4: Switches the SrvTransactionNotImplemented() function pointer located at SrvTransaction2DispatchTable[14] to its own hook function.
  • Step 5: With secondary DoublePulsar payloads (such as inject DLL), the hook function sees if you "knock" correctly and allocates an executable buffer to run your raw shellcode. All other requests are forwarded directly to the original SrvTransactionNotImplemented() function. "Burning" DoublePulsar doesn't completely erase the hook function from memory, just makes it dormant.

After exploitation, you can see the missing symbol in the SrvTransaction2DispatchTable. There are supposed to be 2 handlers here with the SrvTransactionNotImplemented symbol. This is the DoublePulsar backdoor (array index 14):

Honestly, you don't usually wake up in the morning and feel like spending time dissecting ~3600 some odd bytes of Ring-0 shellcode, but I felt productive today. Also I was really curious about this payload and didn't see many details about it outside of Countercept's analysis of the DLL injection code. But I was interested in how the initial SMB backdoor is installed, which is what this post is about.

Zach Harding, Dylan Davis, and I kind of rushed through it in a few hours in our red team lab at RiskSense. There is some interesting setup in the EternalBlue exploit with the IA32_LSTAR syscall MSR (0xc000082) and a region of the Srv.sys containing FEFEs, but I will instead focus on just the raw DoublePulsar methodology... Much like the EXTRABACON shellcode, this one is crafty and does not simply spawn a shell.

Detailed Shellcode Analysis

Inside the Shadow Brokers dump you can find DoublePulsar.exe and EternalBlue.exe. When you use DoublePulsar in FuzzBunch, there is an option to spit its shellcode out to a file. We found out this is a red herring, and that the EternalBlue.exe contained its own payload.

Step 0: Determine CPU Architecture

The main payload is quite large because it contains shellcode for both x86 and x64. The first few bytes use opcode trickery to branch to the correct architecture (see my previous article on assembly architecture detection).

Here is how x86 sees the first few bytes.

You'll notice that inc eax means the je (jump equal/zero) instruction is not taken. What follows is a call and a pop, which is to get the current instruction pointer.

And here is how x64 sees it:

The inc eax byte is instead the REX preamble for a NOP. So the zero flag is still set from the xor eax, eax operation. Since x64 has RIP-relative addressing it doesn't need to get the RIP register.

The x86 payload is essentially the same thing as the x64 so this post only focuses on x64.

Since the NOP was a true NOP on x64, I overwrote the 40 90 with cc cc (int 3) using a hex editor. Interrupt 3 is how debuggers set software breakpoints.

Now when the system is exploited, our attached kernel debugger will automatically break when the shellcode starts executing.

Step 1: Find ntoskrnl.exe Base Address

Once the shellcode figures out it is x64 it begins to search for the base of ntoskrnl.exe. This is done with the following stub:

Fairly straightforward code. In user mode, the GS segment for x64 contains the Thread Information Block (TIB), which holds the Process Environment Block (PEB), a struct which contains all kinds of information about the current running process. In kernel mode, this segment instead contains the Kernel Process Control Region (KPCR), a struct which at offset zero actually contains the current process PEB.

This code grabs offset 0x38 of the KPCR, which is the "IdtBase" and contains a pointer struct of KIDTENTRY64. Those familiar with the x86 family will know this is the Interrupt Descriptor Table.

At offset 4 into the KIDENTRY64 struct you can get a function pointer to the interrupt handler, which is code defined inside of ntoskrnl.exe. From there it searches backwards in memory in 0x1000 increments (page size) for the .exe DOS MZ header (cmp bx, 0x5a4d).

Step 2: Locate Necessary Function Pointers

Once you know where the MZ header of a PE file is, you can peek into defined offsets for the export directory and get the relative virtual address (RVA) of any function you want. Userland shellcode does this all the time, usually to find necessary functions it needs out of ntdll.dll and kernel32.dll. Just like most userland shellcode, this ring 0 shellcode also uses a hashing algorithm instead of hard-coded strings in order to find the necessary functions.

The following functions are found:

ExAllocatePool can be used to create regions of executable memory, and ExFreePool can clean it up when done. These are important so the shellcode can allocate space for its hooks and other functions. ZwQuerySystemInformation is important in the next step.

Step 3: Locate Srv.sys SMB Driver

A feature of ZwQuerySystemInformation is a constant named SystemQueryModuleInformation, with the value 0xb. This gives a list of all loaded drivers in the system.

The shellcode then searched this list for two different hashes, and it landed on Srv.sys, which is one of the main drivers that SMB runs on.

The process here is basically equivalent to getting PEB->Ldr in userland, which lets you iterate loaded DLLs. Instead, it was looking for the SMB driver.

Step 4: Patch the SMB Trans2 Dispatch Table

Now that the DoublePulsar shellcode has the main SMB driver, it iterates over the .sys PE sections until it gets to the .data section.

Inside of the .data section is generally global read/write memory, and stored here is the SrvTransaction2DispatchTable, an array of function pointers that handle different SMB tasks.

The shellcode allocates some memory and copies over the code for its function hook.
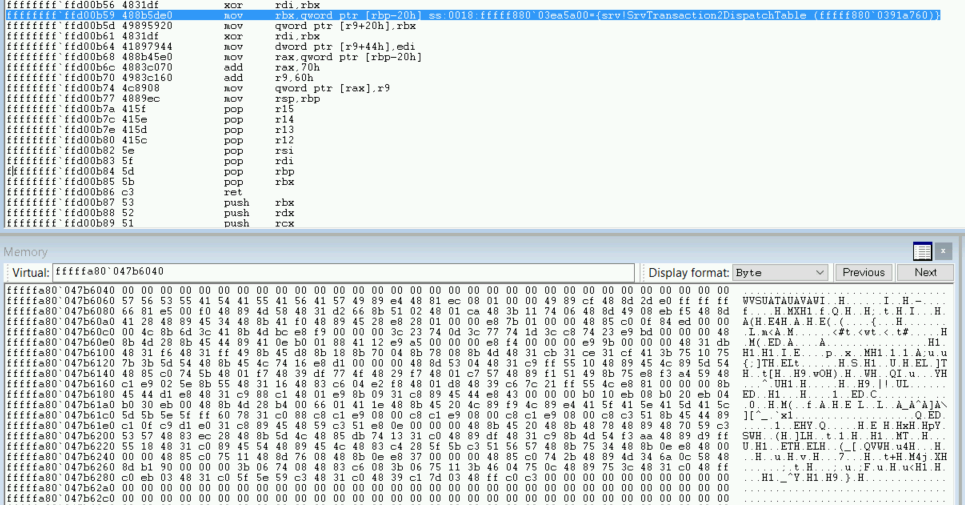
Next the shellcode stores the function pointer for the dispatch named SrvTransactionNotImplemented() (so that it can call it from within the hook code). It then overwrites this member inside SrvTransaction2DispatchTable with the hook.

That's it. The backdoor is complete. Now it just returns up its own call stack and does some small cleanup chores.

Step 5: Send "Knock" and Raw Shellcode

Now when DoublePulsar sends its specific "knock" requests (which are seen as invalid SMB calls), the dispatch table calls the hooked fake SrvTransactionNotImplemented() function. Odd behavior is observed: normally the SMB response MultiplexID must match the SMB request MultiplexID, but instead it is incremented by a delta, which serves as a status code.

Operations are hidden in plain sight via steganography, which do not have proper dissectors in Wireshark.

The status codes (via MultiplexID delta) are:

  • 0x10 = success
  • 0x20 = invalid parameters
  • 0x30 = allocation failure

The opcode list is as follows:

  • 0x23 = ping
  • 0xc8 = exec
  • 0x77 = kill

You can tell which opcode was called by using the following algorithm:

t = SMB.Trans2.Timeout
op = (t) + (t >> 8) + (t >> 16) + (t >> 24);

Conversely, you can make the packet using this algorithm, where k is randomly generated:

op = 0x23
k = 0xdeadbeef
t = 0xff & (op - ((k & 0xffff00) >> 16) - (0xffff & (k & 0xff00) >> 8)) | k & 0xffff00

Sending a ping opcode in a Trans2 SESSION_SETUP request will yield a response that holds part of a XOR key that needs to be calculated for exec requests.

The "XOR key" algorithm is:

s = SMB.Signature1
x = 2 * s ^ (((s & 0xff00 | (s << 16)) << 8) | (((s >> 16) | s & 0xff0000) >> 8))

More shellcode can be sent with a Trans2 SESSION_SETUP request and exec opcode. The shellcode is sent in the "data payload" part of the packet 4096 bytes at a time, using the XOR key as a basic stream cipher. The backdoor will allocate an executable region of memory, decrypt and copy over the shellcode, and run it. The Inject DLL payload is simply some DLL loading shellcode prepended to the DLL you actually want to inject.

We can see the hook is installed at SrvTransaction2DispatchTable+0x70 (112/8 = index 14):

And of course the full disassembly listing.

Conclusion

There you have it, a highly sophisticated, multi-architecture SMB backdoor. The world probably did not need a remote Windows kernel payload this advanced being spammed across the Internet. It's an unique payload, because you can infect a system, lay low for a little bit, and come back later when you want to do something more intrusive. It also finds a nice place in the system to hide out and not alert built-in defenses like PatchGuard. It is unclear if newer versions of PatchGuard, such as those in Windows 10, already detect this hook. We can expect them to be added if not.

Usually we only get to see kernel shellcode in local exploits, as it swaps process tokens in order to privilege escalate. However, Microsoft does many networking things in the kernel, such as Srv.sys and HTTP.sys. The techniques demonstrated are in many ways completely analagous to how usermode shellcode operates during remote exploits.

If/when this gets ported over to Metasploit, I would probably not copy this verbatim, and rather skip the backdoor idea. It isn't the most secure thing to do, as it's not a big secret anymore and anyone else can come along and use your backdoor.

Here's what can be done instead:

  1. Obtain ntoskrnl.exe address in the same fashion as DoublePulsar, and read export directory for necessary functions to perform the next operations.
  2. Spawn a hidden process (such as notepad.exe).
  3. Queue an APC with Meterpreter payload.
  4. Resume process, and exit the kernel cleanly.

Every major malware family, from botnets to ransomware to banking spyware, will eventually add the exploits in the FuzzBunch toolkit to their arsenal. This payload is simply a mechanism to load more malware with full system privileges. It does not open new ports, or have any real encryption or other features to prevent others from taking advantage of the same hole, making the attribution game for digital forensic investigators even more difficult. This is a jewel compared to the scraps that were given to Stuxnet. It comes in a more dangerous era than the days of Conficker. Given the persistence of the missing MS08-067 patch, we could be in store for a decade of breaches emanating from MS17-010 exploits. It is the perfect storm for one of the most damaging malware infections in computing history.

Sunday, November 6, 2016

Hack the Vote CTF "The Wall" Solution

RPISEC ran a capture the flag called Hack the Vote 2016 that was themed after the election. In the competition was "The Wall" challenge by itszn.

The Wall challenge clue:

The Trump campaign is running a trial of The Wall plan. They want to prove that no illegal immigrants could get past it. If that goes as planned, us here at the DNC will have a hard time swinging some votes in the southern boarder states. We need you to hack system and get past the wall. I heard they have put extra protections into place, but we think you can still do it. If you do get into America, there should be a flag somewhere in the midwest that you can have. You will be US "citizen" after all.

The challenge link was a tarball with a bunch of directories. Inside the /bin/ folder was an x64 ELF called "minetest", which is a Minecraft clone. I was pleased to see this was a video game challenge, having a fair amount of infamy for hacking online games in my past lives.

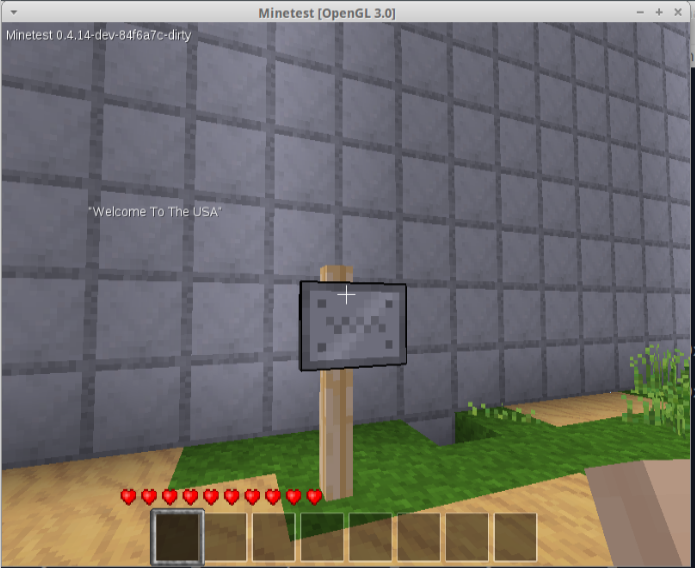
When you run the game, you log onto a server and are greeted with Trump's wall. It's yuuuge, spanning infinitely across the horizontal plane.

So the goal must be to get around this wall and into America. I tried a few naive approaches, as I just wanted to get something like a simple warp or run-through-wall type of cheat running, but alas there was an anti-cheat built into the game.

No problem, it wouldn't be the first time I've had to defeat an anti-cheat system. I started reversing a function called Client::handleCommand_CheatChallange() (sic):

I deduced this function was reading /proc/self/maps and running a SHA1 function on it. At first I was going to just overwrite this function to make it give the expected SHA1, but then I started backing up and found this function was only called when you first joined the server. So all that was needed to bypass the anti-cheat was to delay load however I planned to cheat.

Poking around the game and binary some more, I noticed there was a "fly" mode, that my client didn't have the privilege from the server for:

Well, my client still has the code for flying even if the server says I don't have the privilege. I found a function called Client::checkLocalPrivilege(). The function takes a C++ std::string of a privilege (such as fly) and returns a bool.

Yea, this guy's doing way too much work for me. Time to patch it with the following assembly:

inc eax   ; ff c0
ret       ; c3  
nop       ; 90

This will make the function always return true when my client checks if I have access to a certain privilege. After logging into the server, I attached to my client with GDB and patched my new assembly into the privilege check function:

Now that I could fly, I noticed the wall also grew infinitely vertical. Fortunately, from way up high I was able to glitch through the wall.

I made it!

I wandered through the desert for 40 days and 40 night cycles.

No really, I wandered a long time. I should also mention disabling the privilege checks gives access to a speed hack, but it was a little glitchy and the server kept warping me backwards.

I was starting to get worried, when all of a sudden I saw beautiful Old Glory off in the distance.

Thursday, September 8, 2016

Removing Sublime Text Nag Window

I contemplated releasing this blog post earlier, and now that everyone has moved on from Sublime Text to Atom there's really no reason not to push it out. This is posted purely for educational purposes.

Everyone who has used the free version of Sublime Text knows that when you go to save a file, it will randomly show a popup asking you to buy the software. This is known as a "nag window".


The first time I saw it, I knew it had to be cracked. Just pop open the sublime_text.exe file in IDA Pro and search for the string.


We find a match, and IDA tells us where it is cross referenced.


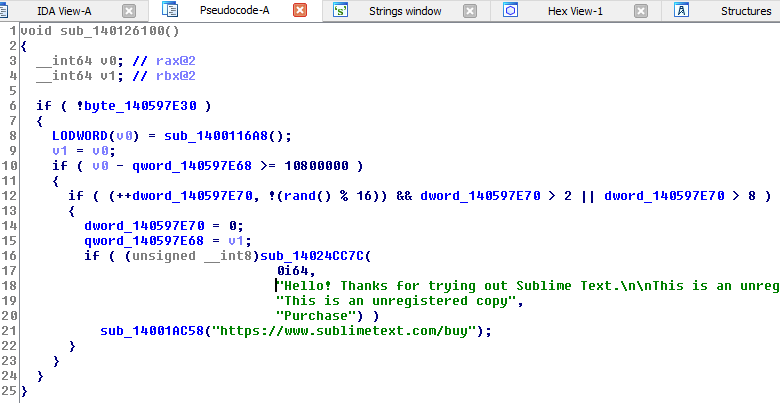
We open the function that uses these .rdata bytes and see that it checks some globals, and performs a call to rand(). If any of the checks fail it will display the popup. The function itself is only about 20 lines of pretty basic assembly but we decompile it anyway because the screenshot is cooler that way.


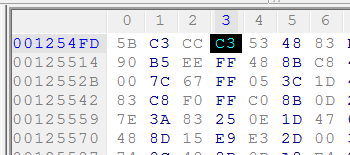
We open the hex view to see what the hex code for the start of the function looks like.


Next we open sublime_text.exe in Hex Workshop and search for the hex string that matches the assembly.


Finally, we patch the beginning of the function with the assembly opcode c3, which will cause the function to immediately return.


After saving, there will be no more nag window. As an exercise to the reader, try to make Sublime think you have a registered copy.

Friday, January 16, 2015

Pwn Adventure 3 Speed Hack

The Ghost in the Shellcode CTF has a number of challenges within an Unreal engine MMO. The game, Choose Your Pwn Adventure 3, is designed to be hacked. The hackable game code is mostly in a DLL called GameLogic.dll, which is a C++ binary with a provided debug .pdb file.

You start out running pretty slowly, so getting around the huge island is a pain. It's simple to get some basic speed hacking going though.

After going through the DLL and looking at function names that seemed interesting, I ran across the following:


I followed the offset and found the following there:

.rdata:10078B14 __real@40400000 dd 3.0

The hex for the float value was 0x4040. I changed this modifier to be a little bit higher by patching the DLL with a hex editor.


And that's it.

Thursday, January 15, 2015

Practical Reverse Engineering p. 79 #10

Question number 10 on page 79 of Practical Reverse Engineering is as follows:

Figure 2-16 is a function from Windows RT. Read MSDN if needed. Ignore the security PUSH/POP cookie routines.

Here is the disassembly of the function:

Figure 2-16. Practical Reverse Engineering. © 2014 by Bruce Dang

 The ARM processor is in Thumb state, but transfers out during some of the syscalls. The function queries different clock APIs depending on the size of the supplied struct.

size_t QueryChrono(size_t *bytes_copied, 
                   size_t max_size, 
                   struct *clock_info)
{
    /* MOVS R4, #0 */
    bytes_copied = 0;

    /* CMP R5, #0x10 */
    if (max_size >= 16)
    {
        SYSTEMTIME sysTime;           /* SUB SP, SP, #0x10 */
        GetSystemTime(&sysTime);      /* LDR R3, =__imp_GetSystemTime */

        /* LDR R3, [SP,#0x1C+var_1C] */
        /* LDR R3, [SP,#0x1C+var_18] */
        /* LDR R3, [SP,#0x1C+var_14] */
        /* LDR R3, [SP,#0x1C+var_10] */
        /* STR R3, [R6,#0xC] */
        memcpy(clock_info->sysTime0x0, &sysTime, sizeof(SYSTEMTIME));

        bytes_copied = 16;              /* MOVS R4, #0x10 */
    }

    /* SUBS R3, R5, R4 */
    /* CMP R3, #4 */
    if ((max_size - bytes_copied) >= 4)
    {
        /* LDR R3, =__imp_GetCurrentProcessId */
        /* STR R0, [R6,R4] */
        *(clock_info + bytes_copied) = GetCurrentProcessId();

        bytes_copied += 4;              /* ADDS R4, #4 */
    }


    /* SUBS R3, R5, R4 */
    /* CMP R3, #4 */
    if ((max_size - bytes_copied) >= 4)
    {
        /* LDR R3, =__imp_GetTickCount */
        /* STR R0, [R6,R4] */
        *(clock_info + bytes_copied) = GetTickCount();

        bytes_copied += 4;              /* ADDS R4, #4 */
    }


    /* SUBS R3, R5, R4 */
    /* CMP R3, #9 */
    if ((max_size - bytes_copied) >= 8)
    {
        /* MOV R0, SP */
        LARGE_INTEGER perfCount;

        /* LDR R3, =__imp_QueryPerformanceCounter */
        QueryPerformanceCounter(&perfCount);

        /* STR R3, [R6,R4] */
        /* STR R3, [R2,#4] */
        memcpy((clock_info + bytes_copied), &perfCount,
                sizeof(LARGE_INTEGER));

        bytes_copied += 8;              /* ADDS R4, #8 */
    }

    return bytes_copied;                /* MOV R0, R4 */
}

Tuesday, January 13, 2015

Practical Reverse Engineering p. 79 #9

Question number 9 on page 79 of Practical Reverse Engineering is as follows:

What does the function shown in Figure 2-15 do?

Here is the function's disassembly:

Figure 2-15. Practical Reverse Engineering. © 2014 by Bruce Dang

The ARM processor is in Thumb state. This is essentially the same functionality as Figure 2-14, except the count variable is gone.

int32_t comparison(char *str1, char *str2)
{
    /* LDR R5, =byteArray */
    static BYTE byteArray[] = {0, 1, ..., 0xff};

    while(1)
    {
        /* CMP R4, #0 */
        if (*str1 == '\0')
            break;

        /* LDRB R3, [R1] */
        /* LDRB R4, [R3,R6] */
        /* LDRB R3, [R5,R6] */
        /* CMP R3, R4 */
        if (byteArray[*str1] != byteArray[*str2])
            break;

        ++str1;         /* ADDS R0, #1 */
        ++str2;         /* ADDS R1, #1 */
    }

    /* LDRB R2, [R3,R5] */   
    /* LDRB R3, [R3,R5] */
    /* SUBS R0, R3, R2 */
    return byteArray[*str1] - byteArray[*str2];   
}

Practical Reverse Engineering p. 79 #8

Question number 8 on page 79 of Practical Reverse Engineering is as follows:

In Figure 2-14, byteArray is a 256-character array whose content is byteArray[] = {0, 1, ..., 0xff}.

Here is the disassembly of the function:

Figure 2-14. Practical Reverse Engineering. © 2014 by Bruce Dang


The ARM processor is in Thumb state. We infer that this function takes two strings, as there is byte comparisons and the null byte ends the main loop. There is a 3rd argument which can terminate the main loop early as well. The function is a pretty straightforward translation to C.

int32_t comparison(char *str1, char *str2, uint32_t count)
{
    /* LDR R6, =byteArray */
    static BYTE byteArray[] = {0, 1, ..., 0xff};

    /* CMP R2, #0 */
    while (count > 0)
    {
        --count;    /* SUBS R2, #1 */

        /* LDRB R5, [R0] */
        /* CBZ R5, loc_100E352 */
        if (*str1 == '\0')
            break;

        /* LDRB R3, [R1] */
        /* LDRB R4, [R3,R6] */
        /* LDRB R3, [R5,R6] */
        /* CMP R3, R4 */
        if (byteArray[*str1] != byteArray[*str2])
            break;

        ++str1;     /* ADDS R0, #1 */
        ++str2;     /* ADDS R1, #1 */
    }

    /* SUBS R2, #1 */
    /* CMP R2, #0 */
    if ((count - 1) >= 0)
    {
        /* LDRB R2, [R3,R6] */   
        /* LDRB R3, [R3,R6] */
        /* SUBS R0, R3, R2 */
        return byteArray[*str1] - byteArray[*str2];    
    }

    return NULL;        /* MOVS R0, #0 */
}

Monday, January 12, 2015

Practical Reverse Engineering p. 79 #7

Question number 7 on page 79 of Practical Reverse Engineering is as follows:

Figure 2-13 illustrates a common routine, but you may not have seen it implemented this way.

Here is the disassembly of the function:

Figure 2-13. Practical Reverse Engineering. © 2014 by Bruce Dang


The ARM processor is in Thumb state. We immediately recognize this is a strlen() routine. There is a bit field clear at the end, whose purpose is unclear. Here is how the function is implemented:

size_t strlen(const char *str)
{
    /* CBNZ R0, loc_100E1D8 */
    if (r0 == NULL)
        return 0;   /* MOVS R0, #0 */

    /* MOV R2, R0 */
    char *index = str;
    
    while (1)               /* loc_100E1E4 */
    {
        /* CMB R3, #0 */
        if (*index == '\0')
            break;

        ++index;            /* ADDS R2, #1 */
    }

    /* SUBS R0, R2, R0 */
    return (index - str);
}

Practical Reverse Engineering p. 79 #6

Question number 6 on page 79 of Practical Reverse Engineering is as follows:

Figure 2-12 involves some twiddling.

Here is a disassembly of the function:

Figure 2-12. Practical Reverse Engineering. © 2014 by Bruce Dang


The ARM processor is in Thumb state. The function takes a struct that has a size value and array in it. The array is enumerated looking for a search value, then returning a type of bitmask on its location.

uint64_t search_mask(struct *r0, DWORD search)
{
    /* loc_103B3A8 */
    for (   
        DWORD i = 0;            /* MOVS R2, #0 */
        i < r0->numElements;    /* CMP R2, R4 */
        ++i;                    /* ADDS R2, #1 */
    )
    {
        /* LDR.W R3, [R0,#4]! */
        /* CMP R3, R1 */
        if (r0->elements[i] == search)
        {
            /* SUBS.W R3, R2, #0X20 */
            /* LSLS R1, R3 */
            search = 1 << (i - 0x20);

            /* MOVS R3, #1 */
            /* LSLS.W R0, R3, R2 */
            return (uint64_t) 1 << i;  
        }

    }

    search = 0; /* MOVS R1, #0 */
    return 0;   /* MOVS R0, #0 */
}

Here is a struct definition:

struct r0
{
    DWORD numElements;  /* 0x0 */
    DWORD elements[?];  /* 0x4 */
}

Practical Reverse Engineering p. 79 #5

Question number 5 on page 79 of Practical Reverse Engineering is as follows:

Figure 2-11 is simple as well. The actual string names have been removed so you cannot cheat by searching the Internet.

Here is the disassembly of the function:

Figure 2-11. Practical Reverse Engineering. © 2014 by Bruce Dang

The ARM processor is in Thumb state. This function can be written as a switch statement. It essentially takes an enum and returns a string based on the value.

const char *get_string(DWORD string_enum)
{
    /* MOV R3, R0 */
    switch (string_enum)
    {
        case 6:             /* CMP R3, #6 */
            return "E";     /* LDR R0, =aE ; "E" */

        case 7:             /* CMP R3, #7 */
            return "D";     /* LDR R0, =aD ; "D" */

        case 8:             /* CMP R3, #8 */
            return "C";     /* LDR R0, =ac ; "C" */

        case 9:             /* CMP R3, #9 */
            return "B";     /* LDR R0, =aB ; "B" */

        default:
            return "A";     /* LDR R0, =aA ; "A" */ 
    }
}

Practical Reverse Engineering p. 79 #4

Question number 4 on page 79 of Practical Reverse Engineering is as follows:

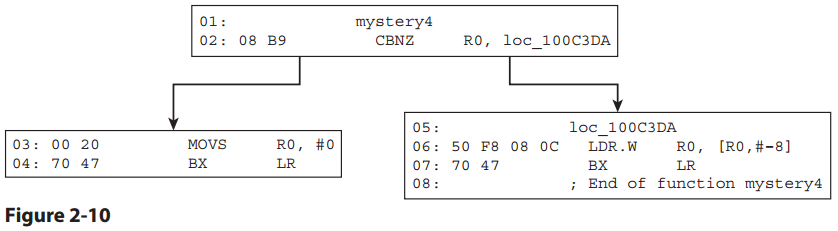
Figure 2-10 shows another easy function.

Here is the function's disassembly:

Figure 2-10. Practical Reverse Engineering. © 2014 by Bruce Dang


The ARM processor is in Thumb state. This function takes a pointer of an unknown type. If the pointer is null, it returns 0. Otherwise it subtracts 8 bytes from the pointer and returns the value there.

DWORD sub8_ptr(void *r0)
{
    /* CBNZ R0, loc_100C3DA */
    if (r0 == NULL)
        return 0;       /* MOVS R0, #0 */

    return *(r0 - 8);   /* LDR.W R0, [R0,#–8]  */
}

Practical Reverse Engineering p. 79 #3

Question number 3 on page 79 of Practical Reverse Engineering is as follows:

Here is a simple function:

01: mystery3
02: 83 68 LDR R3, [R0,#8]
03: 0B 60 STR R3, [R1]
04: C3 68 LDR R3, [R0,#0xC]
05: 00 20 MOVS R0, #0
06: 4B 60 STR R3, [R1,#4]
07: 70 47 BX LR
08: ; End of function mystery3

The ARM processor is in Thumb state. This function just copies some values from the first struct to the second struct. It always returns 0.

int copy_struct_values(struct *r0, struct *r1)
{
    /* LDR R3, [R0,#8] */
    /* STR R3, [R1] */
    r1->Unknown0x0 = r0->Unknown0x8;                

    /* LDR R3, [R0,#0xC] */   
    /* STR R3, [R1,#4] */
    r1->Unknown0x4 = r0->Unknown0xc;

    return 0;   /* MOVS R0, #0 */
}

Here are the struct definitions:

struct r0
{
    BYTE Unknown0x0[0x8];   /* 0x0 */
    DWORD Unknown0x8;       /* 0x8 */
    DWORD Unknown0xc;       /* 0xc */
}

struct r1
{
    DWORD Unknown0x0;   /* 0x0 */
    DWORD Unknown0x4;   /* 0x4 */
}

Practical Reverse Engineering p. 78 #2

Question number 2 on page 78 of Practical Reverse Engineering is as follows:

Figure 2-9 shows a function that was found in the export table.

Here is the function's disassembly:

Figure 2-9. Practical Reverse Engineering. © 2014 by Bruce Dang


 We can immediately tell the ARM processor should be in Thumb state. This function checks if the struct passed is NULL. If it is not, then one of the members is checked to see if the byte equals 0.

BOOL check_struct_char(struct *r0)
{
    /* CBZ R0, loc_C672 */
    if (r0 != NULL)
    {    
        /* LDRB.W R0, [R0,#0x63] */
        /* SUBS R0, #0 */
        if (r0->Unknown0x63 == 0)
            return FALSE; 
    }  

    return TRUE;           /* MOVS R0, #1 */
}

And here is a definition of the passed struct:

struct r0
{
    BYTE Unknown0x0[0x63];  /* 0x0 */
    CHAR Unknown0x63;       /* 0x63 */
}

Practical Reverse Engineering p. 78 #1

Question number 1 on page 78 of Practical Reverse Engineering is as follows:

Figure 2-8 shows a function that takes two arguments. It may seem somewhat challenging at fi rst, but its functionality is very common. Have patience.

Indeed the disassembly does appear to be a reasonably complex function.

Figure 2-8. Practical Reverse Engineering. © 2014 by Bruce Dang

This function is not in Thumb state as every instruction is 32-bits in width. It attempts to convert an ASCII string to a signed decimal number. It is very lenient as far as input (even accepting non-numerical characters in the string input), however it will not work on strings exceeding the MAX_INT constant of 2147483648 (0x80000000).

Here is a close 1 to 1 approximation from ARM to C:
 
BOOL ascii_to_decimal(const char *str, int32_t *retNum)
{
    BOOL negative;
    int i = 0;              /* LDRB R3, [R0] */

    /* CMP R3, #0x2D */
    if  (str[i] == '-')
    {
        ++i;                /* LDRB R3, [R0,#1]! */
        negative = TRUE;    /* MOV R6, #1 */
    }
    else 
    {
        negative = FALSE;   /* MOV R6, #0 */

        /* CMP R3, #0x2B */
        if (str[i] == '+')
            ++i;            /* LDREQB R3, [R0,#1]! */
    }

    /* CMP R3, #0x30 */
    if (str[i] == '0')
    {
        /* CMP R2, #0x30 */
        while (str[i] == '0')
            ++i;            /* LDRB R2, [R3],#1 */    
    }

    const int base = 10;    /* MOV R8, #0xA */
    int64_t result = 0;

    while (TRUE)
    {    
        result *= base;         /* UMULL R2, R3, R4, R8 */
        result += str[i] - '0'; /* ADDS R4, R2, R7 */
        ++i;                    /* ADD R12, R12, #1 */

        /* SUBS R7, R7, #0x30 */
        if (str[i] < '0')
            break;

        /* CMP R7, #9 */
        if (str[i] > '9')
            break;
    }

    /* CMP R2, #0x80000000 */
    if (abs((int32_t) result) > INT_MAX)
        return FALSE;               /* MOV R0, #0 */

    *retNum = (int32_t) result;     /* STR R4, [R1] */
    return TRUE;                    /* MOV R0, #1 */
}

Wednesday, January 7, 2015

Practical Reverse Engineering p. 36 #10

Question number 10 on page 36 of Practical Reverse Engineering is as follows:

If the current privilege level is encoded in CS, which is modifiable by user-mode code, why can’t user-mode code modify CS to change CPL?

The Code Segment (CS) contains a 2-bit value known as the Code Privilege Level (CPL), which is a cached value of the current Ring mode.

The reason user-mode cannot directly modify CS:CPL is the same reason it cannot directly access the instruction pointer (CS:EIP). It's true that CS:EIP is changed with CALL, RET, and JMP instructions; but it cannot be modified by directly loading a value to the register. The same is true for CS:CPL.

To transition to a higher privilege, an instruction like SYSCALL or INT should be used. These will trigger handlers running in kernel-mode.  To modify the CS:CPL to user-mode, an instruction of the IRET family should be used.

Ring 0 code has more privileges to modify the CS segment than Ring 3 code does. However, modifying CS in both x86 and x64 can cause system instability, and should only be performed in real mode.

Practical Reverse Engineering p. 35 #9

Question number 9 on page 35 of Practical Reverse Engineering is as follows:

Sample L. Explain what function sub_1000CEA0 does and then decompile it back to C.

Here is the disassembly of the function:

sub_1000CEA0:
    push    ebp
    mov     ebp, esp
    push    edi
    mov     edi, [ebp+8]
    xor     eax, eax
    or      ecx, 0FFFFFFFFh
    repne scasb
    add     ecx, 1
    neg     ecx
    sub     edi, 1
    mov     al, [ebp+0Ch]
    std
    repne scasb
    add     edi, 1
    cmp     [edi], al
    jz      short loc_1000CEC7
    xor     eax, eax
    jmp     short loc_1000CEC9 

loc_1000CEC7:                          
    mov     eax, edi

loc_1000CEC9:                       
    cld
    pop     edi
    leave
    retn

This function calculates the string length, then works backwards to return a pointer to the last instance of a character in the string.

char *sub_1000CEA0(char *str, char ch)
{
    /* mov edi, [ebp+8] */
    /* xor eax, eax
    /* or ecx, 0FFFFFFFFh */
    /* repne scasb */
    /* add ecx, 1 */
    /* neg ecx */
    size_t len = 1;
    while (*str)
    {
        ++str;
        ++len;
    }

    /* sub edi, 1 */
    /* mov al, [ebp+0Ch] */
    /* std */
    /* repne scasb */
    /* add edi, 1 */ 
    while (len)
    {
        /* cmp [edi], al */
        if (*str == ch)
            return str;
        --len;
        --str;
    }

    return 0;
}

This is an implementation of the strrchr() function, which is defined as follows:

char *strrchr(char *str, int character);

Practical Reverse Engineering p. 35 #8

Question number 8 on page 35 of Practical Reverse Engineering is as follows:

Sample H. Decompile sub_11732 and explain the most likely programming construct used in the original code.

The function's disassembly looks like the following:

sub_1172E:
    push    esi
    mov     esi, [esp+8]
    dec     esi
    jz      short loc_1175F
    dec     esi
    jz      short loc_11755
    dec     esi
    jz      short loc_1174B
    sub     esi, 9
    jnz     short loc_1176B
    mov     esi, [eax+8]
    shr     esi, 1
    add     eax, 0Ch
    jmp     short loc_11767 

loc_1174B:                             
    mov     esi, [eax+3Ch]
    shr     esi, 1
    add     eax, 5Eh
    jmp     short loc_11767 

loc_11755:                            
    mov     esi, [eax+3Ch]
    shr     esi, 1
    add     eax, 44h
    jmp     short loc_11767 

loc_1175F:                          
    mov     esi, [eax+3Ch]
    shr     esi, 1
    add     eax, 40h

loc_11767:                         
                        
    mov     [ecx], esi
    mov     [edx], eax

loc_1176B:                              
    pop     esi
    retn    4 

The function contains a switch. The calling convention is odd for x86 as there are three variables passed in a register, which means it was probably compiled as a static unit. There is a lot of repeated code, which means either the programmer or the compiler couldn't optimize the size in a logical way. Here is a more natural way to write the function:

static struct *sub_1172E(struct *arg1, struct *arg2, 
                         struct *arg3, int unknown_enum)
{
    DWORD dwUnknown;

    /* mov esi, [esp+8] */
    switch (unknown_enum)
    {
        case 1:                 /* dec esi */
            arg1 += 64;         /* add eax, 40h */
        break;

        case 2:                 /* dec esi */
            arg1 += 68          /* add eax, 44h */
        break;

        case 3:                 /* dec esi */
            arg1 += 94;         /* add eax, 5Eh */
        break;

        case 12:                /* sub esi, 9 */
            arg1 += 12;         /* add eax, 0Ch */
        break;

        default:
            return arg1;
    }
     
    dwUnknown = (unknown_enum == 12) ? 
            arg1->Unknown0x8 :  /* mov esi, [eax+8] */
            arg1->Unknown0x3c;  /* mov esi, [eax+3Ch] */

    dwUnknown /= 2;             /* shr esi, 1 */

    *arg2 = dwUnknown;          /* mov [ecx], esi */
    *arg3 = arg1;               /* mov [edx], eax */

    return arg1;
}

We can infer some of the struct in the first argument by where offsets were accessed:

struct arg1 {
    BYTE Unknown0x0[0x8];   /* 0x0 */
    DWORD bigTwiceVal;      /* 0x8 */
    BYTE Unknown0xc[0x30];  /* 0xc */
    DWORD smallTwiceVal;    /* 0x3c */
};

Tuesday, January 6, 2015

Practical Reverse Engineering p. 35 #7

Question number 7 on page 35 of Practical Reverse Engineering is as follows:

Sample H. The function sub_10BB6 has a loop searching for something. First recover the function prototype and then infer the types based on the context. Hint: You should probably have a copy of the PE specification nearby.

Here is an image that details the PE file format, which is useful for referencing offsets.


The structs that make up the PE file format are:

typedef struct _IMAGE_DOS_HEADER
{
    WORD e_magic;              /* 0x0 */
    WORD e_cblp;               /* 0x2 */
    WORD e_cp;                 /* 0x4 */
    WORD e_crlc;               /* 0x6 */
    WORD e_cparhdr;            /* 0x8 */
    WORD e_minalloc;           /* 0xa */
    WORD e_maxalloc;           /* 0xc */
    WORD e_ss;                 /* 0xe */
    WORD e_sp;                 /* 0x10 */
    WORD e_csum;               /* 0x12 */
    WORD e_ip;                 /* 0x14 */
    WORD e_cs;                 /* 0x16 */
    WORD e_lfarlc;             /* 0x18 */
    WORD e_ovno;               /* 0x1a */
    WORD e_res[4];             /* 0x1c */
    WORD e_oemid;              /* 0x24 */
    WORD e_oeminfo;            /* 0x26 */
    WORD e_res2[10];           /* 0x28 */
    LONG e_lfanew;             /* 0x3c */
} IMAGE_DOS_HEADER, *PIMAGE_DOS_HEADER;

typedef struct _IMAGE_NT_HEADERS {
    DWORD                 Signature;         /* 0x0 */
    union
    {
        IMAGE_FILE_HEADER     FileHeader;    /* 0x4 */
        struct
        {
            WORD  Machine;                   /* 0x4 */
            WORD  NumberOfSections;          /* 0x6 */
            DWORD TimeDateStamp;             /* 0x8 */
            DWORD PointerToSymbolTable;      /* 0xc */
            DWORD NumberOfSymbols;           /* 0x10 */
            WORD  SizeOfOptionalHeader;      /* 0x14 */
            WORD  Characteristics;           /* 0x16 */
        }
    }
    IMAGE_OPTIONAL_HEADER OptionalHeader;    /* 0x18 */
} IMAGE_NT_HEADERS, *PIMAGE_NT_HEADERS;

Here is the disassembly of the function in Sample H:

sub_10BB2:
    mov     eax, [esp+4]
    push    ebx
    push    esi
    mov     esi, [eax+3Ch]
    add     esi, eax
    movzx   eax, word ptr [esi+14h]
    xor     ebx, ebx
    cmp     [esi+6], bx
    push    edi
    lea     edi, [eax+esi+18h]
    jbe     short loc_10BEB

loc_10BCE:                             
    push    [esp+0Ch+8]     ; _DWORD
    push    edi             ; _DWORD
    call    ds:dword_169A4
    test    eax, eax
    pop     ecx
    pop     ecx
    jz      short loc_10BF3
    movzx   eax, word ptr [esi+6]
    add     edi, 28h
    inc     ebx
    cmp     ebx, eax
    jb      short loc_10BCE

loc_10BEB:                              
    xor     eax, eax

loc_10BED:                            
    pop     edi
    pop     esi
    pop     ebx
    retn    8 

loc_10BF3:                             
    mov     eax, edi
    jmp     short loc_10BED

Making the assumption that our first argument is a pointer to the DOS header (from the hint in the question), we can use a little bit of math to calculate the offsets and see everything lines up. The search code could be written in a for loop but I used a while loop for more clarity.

PIMAGE_SECTION_HEADER sub_10BB2(PVOID pPE, PVOID arg2)
{
    PIMAGE_DOS_HEADER pDOS;
    PIMAGE_NT_HEADERS pNT;
    PIMAGE_SECTION_HEADER pSection;
    WORD dwOptHdrSize;
    DWORD dwCurrentSection;

    /* mov eax, [esp+4] */
    pDOS = (PIMAGE_DOS_HEADER) pPE;

    /* mov esi, [eax+3Ch] */
    /* add esi, eax */
    pNT = (pDOS + pDOS->e_lfanew);

    /* movzx eax, word ptr [esi+14h] */
    dwOptHdrSize = pNT->FileHeader.SizeOfOptionalHeader;

    /* xor ebx, ebx */
    dwCurrentSection = 0;

    /* cmp [esi+6], bx */
    if (pNT->NumberOfSections == 0)
        return NULL;

    /* lea edi, [eax+esi+18h] */
    pSection = IMAGE_FIRST_SECTION(pNT);

    while (1)
    {
        /* push [esp+0Ch+8] */
        /* push edi  */
        /* call ds:dword_169A4 */
        /* test eax, eax */
        if (*(BOOL)dword_169A4)(pSection, arg2))
            return pSection;

        /* add edi, 28h */
        ++pSection; /* struct increment */

        /* inc ebx */
        ++dwCurrentSection;

        /* movzx eax, word ptr [esi+6] */
        /* cmp ebx, eax */
        if (dwCurrentSection > pNT->NumberOfSections)
            return NULL;
    }
}

Practical Reverse Engineering p. 35 #6

Question number 6 on page 35 of Practical Reverse Engineering is as follows:

Sample H. The function sub_13846 references several structures whose types are not entirely clear. Your task is to first recover the function prototype and then try to reconstruct the structure fields. After reading Chapter 3, return to this exercise to see if your understanding has changed. (Note: This sample is targeting Windows XP x86.)

The function disassembles to:

sub_13842:
     mov     eax, [ecx+60h]
     push    esi
     mov     esi, [edx+8]
     dec     byte ptr [ecx+23h]
     sub     eax, 24h
     mov     [ecx+60h], eax
     mov     [eax+14h], edx
     movzx   eax, byte ptr [eax]
     push    ecx
     push    edx
     call    dword ptr [esi+eax*4+38h]
     pop     esi
     retn

It's a fastcall convention which has two struct pointer arguments, and the return type is not readily available. There are 3 locals which are stored in registers, two of them pointers within the struct and a char which is an index to a function call table.

PVOID __fastcall sub_13841(
     struct *arg1, struct *arg2)
{
     ULONG_PTR v1, v2;
     CHAR index;

     v1 = arg1->Unkown0x60;    /* mov eax, [ecx+60h] */
     v2 = arg2->Unknown0x8;    /* mov esi, [edx+8] */

     --arg1->Unknown0x23;      /* dec byte ptr [ecx+23h] */

     v1 -= 0x24;               /* sub eax, 24h */

     arg1->Unknown0x60 = v1;   /* mov [ecx+60h], eax */
     v1->Unknown0x14 = arg2;   /* mov [eax+14h], edx */

     index = v1->index;        /* movzx eax, byte ptr [eax] */

     /* call dword ptr [esi+eax*4+38h] */
     return v2->Unknown0x38[index](arg2, arg1);
}

Here is a basic idea so far on the struct meanings:

struct arg1 {
     BYTE Unknown0x0[0x23];   /* 0x0 */
     CHAR decremented;        /* 0x23 */
     BYTE Unknown0x24[0x18];  /* 0x24 */
     union
     {
         struct *v1[9];           /* 0x3c - 0x60 */
         struct
         {
             struct v1_1[0x3c];   /* 0x3c */
             struct v1_2[0x60];   /* 0x60 */
         };
     };
};

struct arg2 {
     BYTE Unknown0x0[0x8];    /* 0x0 */
     struct *v2;              /* 0x8 */    
};

/* size = 0x24 */
struct v1 {
     CHAR index;              /* 0x0 */
     BYTE Unknown0x1[0x13];   /* 0x1 */
     struct *arg2;            /* 0x14 */
     CHAR Unknown0x18[0xc];   /* 0x18 */
};

struct v2 {
     BYTE Unknown0x0[0x38];   /* 0x0 */
     ULONG_PTR function;      /* 0x38 */   
};

Thursday, December 25, 2014

Final Thoughts on the SLAE64 Certification

As is obvious by my posts over the past few days, I was working on fulfilling the requirements of the x86/64 Assembly and Shellcoding on Linux class at SecurityTube/Pentester Academy to obtain the SLAE64 certification.


All I was seeking from doing this was to fill in the gaps in my knowledge. The course material was exceptional compared to my extremely basic assembly class at a Cal State, and it cost twenty times less. I liked that it makes you put your knowledge to the true test by completing 7 practical assignments of varying difficulty. I certainly have respect for others who have completed the certification.