Update Sept. 24: auxiliary/admin/cisco/cisco_asa_extrabacon is now in the Metasploit master repo. There is support for the original ExtraBacon leak and ~20 other newer versions.
Update Sept. 22: Check this GitHub repo for ExtraBacon 2.0, improved Python code, a Lina offset finder script, support for a few more 9.x versions, and a Metasploit module.
Background
On August 13, 2016 a mysterious Twitter account (@shadowbrokerss) appeared, tweeting a PasteBin link to numerous news organizations. The link described the process for an auction to unlock an encrypted file that claimed to contain hacking tools belonging to the Equation Group. Dubbed last year by Kaspersky Lab, Equation Group are sophisticated malware authors believed to be part of the Office of Tailored Access Operations (TAO), a cyber-warfare intelligence-gathering unit of the National Security Agency (NSA). As a show of good faith, a second encrypted file and corresponding password were released, with tools containing numerous exploits and even zero-day vulnerabilities.
One of the zero-day vulnerabilities released was a remote code execution in the Cisco Adaptive Security Appliance (ASA) device. The Equation Group's exploit for this was named EXTRABACON. Cisco ASAs are commonly used as the primary firewall for many organizations, so the EXTRABACON exploit release raised many eyebrows.
At RiskSense we had spare ASAs lying around in our red team lab, and my colleague Zachary Harding was extremely interested in exploiting this vulnerability. I told him if he got the ASAs properly configured for remote debugging I would help in the exploitation process. Of course, the fact that there are virtually no exploit mitigations (i.e. ASLR, stack canaries, et al) on Cisco ASAs may have weighed in on my willingness to help. He configured two ASAs, one containing version 8.4(3) (which had EXTRABACON exploit code), and version 9.2(3) which we would target to write new code.
This blog post will explain the methodology for the following submissions to exploit-db.com:
- Cisco ASA 9.2(3) - 'EXTRABACON' Authentication Bypass
- Cisco ASA - Authentication Bypass 'EXTRABACON' (Improved Shellcode) (69 bytes)
There is detailed information about how to support other versions of Cisco ASA for the exploit. Only a few versions of 8.x were in the exploit code, however the vulnerability affected all versions of ASA, including all of 8.x and 9.x. This post also contains information about how we were able to decrease the Equation Group shellcode from 2 stages containing over 200+ bytes to 1 stage of 69 bytes.
Understanding the Exploit
Before we can begin porting the exploit to a new version, or improving the shellcode, we first need to know how the exploit works.
This remote exploit is your standard stack buffer overflow, caused by sending a crafted SNMP packet to the ASA. From the internal network, it's pretty much a guarantee with the default configuration. We were also able to confirm the attack can originate from the external network in some setups.
Hijacking Execution
The first step in exploiting a 32-bit x86 buffer overflow is to control the EIP (instruction pointer) register. In x86, a function CALL pushes the current EIP location to the stack, and a RET pops that value and jumps to it. Since we overflow the stack, we can change the return address to any location we want.
In the shellcode_asa843.py file, the first interesting thing to see is:
my_ret_addr_len = 4
my_ret_addr_byte = "\xc8\x26\xa0\x09"
my_ret_addr_snmp = "200.38.160.9"
This is an offset in 8.4(3) to 0x09a026c8. As this was a classic stack buffer overflow exploit, my gut told me this was where we would overwrite the RET address, and that there would be a JMP ESP (jump to stack pointer) here. Sometimes your gut is right:

The vulnerable file is called "lina". And it's an ELF file; who needs IDA when you can use objdump?
Stage 1: "Finder"
The Equation Group shellcode is actually 3 stages. After we JMP ESP, we find our EIP in the "finder" shellcode.
finder_len = 9
finder_byte = "\x8b\x7c\x24\x14\x8b\x07\xff\xe0\x90"
finder_snmp = "139.124.36.20.139.7.255.224.144"
This code finds some pointer on the stack and jumps to it. The pointer contains the second stage.

We didn't do much investigating here as it was the same static offsets for every version. Our improved shellcode also uses this first stage.
Stage 2: "Preamble"
Observing the main Python source code, we can see how the second stage is made:
        wrapper = sc.preamble_snmp
        if self.params.msg:
            wrapper += "." + sc.successmsg_snmp
        wrapper += "." + sc.launcher_snmp
        wrapper += "." + sc.postscript_snmp
Ignoring successmsg_snmp (as the script --help text says DO NOT USE), the following shellcode is built:

It seems like a lot is going on here, but it's pretty simple.
- A "safe" return address is XORed by 0xa5a5a5a5
- unnecessary, yet this type of XOR is everywhere. The shellcode can contain null bytes so we don't need a mask
- Registers smashed by the stack overflow are fixed, including the frame base pointer (EBP)
- The fixed registers are saved (PUSHA = push all)
- A pointer to the third stage "payload" (to be discussed soon) is found on the stack
- This offset gave us trouble. Luckily our improved shellcode doesn't need it!
- Payload is called, and returns
- The saved registers are restored (POPA = pop all)
- The shellcode returns execution to the "safe" location, as if nothing happened
I'm guessing the safe return address is where the buffer overflow would have returned if not exploited, but we haven't actually investigated the root cause of the vulnerability, just how the exploit works. This is probably the most elusive offset we will need to find, and IDA does not recognize this part of the code section as part of a function.
If we follow the function that is called before our safe return, we can see why there are quite a few registers that need to be cleaned up.

These registers also get smashed by our overflow. If we don't fix the register values, the program will crash. Luckily the cleanup shellcode can be pretty static, with only the EBP register changing a little bit based on how much stack space is used.
Stage 3: "Payload"
The third stage is where the magic finally happens. Normally shellcode, as it is aptly named, spawns a shell. But the Equation Group has another trick up its sleeve. Instead, we patch two functions, which we called "pmcheck()" and "admauth()", to always return true. With these two functions patched, we can log onto the ASA admin account without knowing the correct password.
Note: this is for payload "pass-disable". There's a second payload, "pass-enable", which re-patches the bytes. So after you log in as admin, you can run a second exploit to clean up your tracks.
For this stage, there is payload_PMCHECK_DISABLE_byte and payload_AAAADMINAUTH_DISABLE_byte. These two shellcodes perform the same overall function, just for different offsets, with a lot of code reuse.
Here is the Equation Group PMCHECK_DISABLE shellcode:

There's some shellcode trickery going on, but here are the steps being taken:
- First, the syscall to mprotect() marks a page of memory as read/write/exec, so we can patch the code
- Next, we jump forward to right before the end of the shellcode
- The last 3 lines of the shellcode contain the code to "always return true"
- The call instruction puts the current address (where patch code is) on the stack
- The patch code address is pop'd into esi and we jump backwards
- rep movs copies 4 bytes (ecx) from esi (source index) to edi (destination index), then we jump to the admauth() patch
The following is functional equivalent C code:
const void *PMCHECK_BOUNDS = 0x954c000;
const void *PMCHECK_OFFSET = 0x954cfd0;

const int32_t PATCH_BYTES = 0xc340c031;

sys_mprotect(PMCHECK_BOUNDS, 0x1000, PROT_READ | PROT_WRITE | PROT_EXEC);
*PMCHECK_OFFSET = PATCH_BYTES;
In this case, PMCHECK_BYTES will be "always return true".
xor eax, eax   ; set eax to 0  -- 31 c0
inc eax        ; increment eax -- 40
ret            ; return        -- c3
Yes, my friends who are fluent in shellcode, the assembly is extremely verbose just to write 4 bytes to a memory location. Here is how we summarized everything from loc_00000025 to the end in the improved shellcode:
mov dword [PMCHECK_OFFSET], PMCHECK_BYTES
In the inverse operation, pass-enable, we will simply patch the bytes to their original values.
Finding Offsets
So now that we've reverse engineered the shellcode, we know what offsets we need to patch to port the exploit to a new Cisco ASA version:
- The RET smash, which should be JMP ESP (ff e4) bytes
- The "safe" return address, to continue execution after our shellcode runs
- The address of pmcheck()
- The address of admauth()
RET Smash
We can set the RET smash address to anywhere JMP ESP (ff e4) opcodes appear in an executable section of the binary. There is no shortage of the actual instruction in 9.2(3).

Any of these will do, so we just picked a random one.
Safe Return Address
This is the location to safely return execution to after the shellcode runs. As mentioned, this part of the code isn't actually recognized as a function by IDA, and also the same trick we'll use for the Authentication Functions (searching the assembly with ROPgadget) doesn't work here.
The offset in 8.4(3) is 0xad457e33 ^ 0xa5a5a5a5 = 0x8e0db96

This contains a very unique signature of common bytes we can grep for in 9.2(3).

Our safe return address offset is at 0x9277386.
Authentication Functions
Finding the offsets for pmcheck() and admauth() is pretty simple. The offsets in 8.4(3) are not XORed by 0xa5a5a5a5, but the page alignment for sys_mprotect() is.
We'll dump the pmcheck() function from 8.4(3).
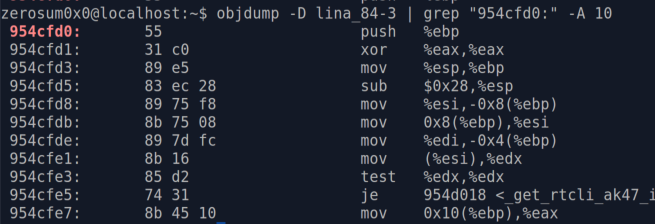
We have the bytes of the function, so we can use the Python ROPGadget tool from Jonathan Salwan to search for those bytes in 9.2(3).

It's a pretty straightforward process, which can be repeated for admauth() offsets. Note that during this process, we get the unpatch bytes needed for the pass-enable shellcode.
Finding the page alignment boundaries for these offsets (for use in sys_mprotect()) is easy as well, just floor to the nearest 0x1000.
Improving the Shellcode
We were able to combine the Equation Group stages "preamble" and "payload" into a single stage by rewriting the shellcode. Here is a list of ways we shortened the exploit code:
- Removed all XOR 0xa5a5a5a5 operations, as null bytes are allowed
- Reused code for the two sys_mprotect() calls
- Used a single mov operation instead of jmp/call/pop/rep movs to patch the code
- General shellcode size optimization tricks (performing the same tasks with ops that use less bytes)
The lackadaisical approach to the shellcode, as well as the Python code, came as a bit of surprise as the Equation Group is probably the most elite APT on the planet. There's a lot of cleverness in the code though, and whoever originally wrote it obviously had to be competent. To me, it appears the shellcode is kind of an off-the-shelf solution to solving generic problems, instead of being custom tailored for the exploit.
By changing the shellcode, we gained one enormous benefit. We no longer have to find the stack offset that contains a pointer to the third stage. This step gave us so much trouble that we started experimenting with using an egg hunter. We know that the stack offset to the third stage was a bottleneck for SilentSignal as well (Bake Your Own EXTRABACON). But once we understood the overall operation of all stages, we were happy to just reduce the bytes and keep everything in the one stage. Not having to find the third stage offset makes porting the exploit very simple.
Future Work
The Equation Group appeared to have generated their shellcode. We have written a Python script that will auto-port the code to different versions. We find offsets using similar heuristics to what ROPGadget offers. Of course, you can't trust a tool 100% (in fact, some of the Equation Group shellcode crashes certain versions). So we are testing each version.
We're also porting the Python code to Ruby, so the exploit will be part of Metasploit. Our Metasploit module will contain the new shellcode for all Shadow Broker versions, as well as offsets for numerous versions not part of the original release, so keep an eye out for it.


